
We have all been there: you open the craft drawer only to find a chaotic jumble of broken tips, wrapperless stubs, and “mystery colors” that are just too small for little hands to hold. Usually, these bits end up at the bottom of the bin, but what if those stray pieces were actually the key to your next great art project?
When we are stuck at home and regular craft supplies are running low, we are forced to look at our “trash” through a more creative lens. This is a wonderful lesson for children; it teaches them that resourcefulness is just as important as artistic skill.
Crayons are essentially just wax and pigment, making them one of the most versatile mediums in the world. Whether you melt them, shave them, or use them to create textured resists, those tiny bits can be transformed into professional-looking decor.
⚠️ SAFETY FIRST: Many of the projects listed below involve heat—such as hair dryers, ovens, or irons—to melt the wax. Adult supervision is mandatory for these steps to ensure a safe and fun crafting experience.
The Science and Art of Wax: 15 Crayon Projects
1. Melted Crayon Butterflies
These butterflies look like delicate watercolor paintings, but the secret is melted wax!
- The Technique: Shave small bits of different colored crayons onto a piece of parchment paper. Fold the paper in half and lightly run a warm iron over the top (place a towel between the iron and parchment).
- The Result: Once the wax has spread and cooled, cut out butterfly shapes. These semi-translucent beauties look stunning when arranged on a foam board or canvas to create 3D wall art.
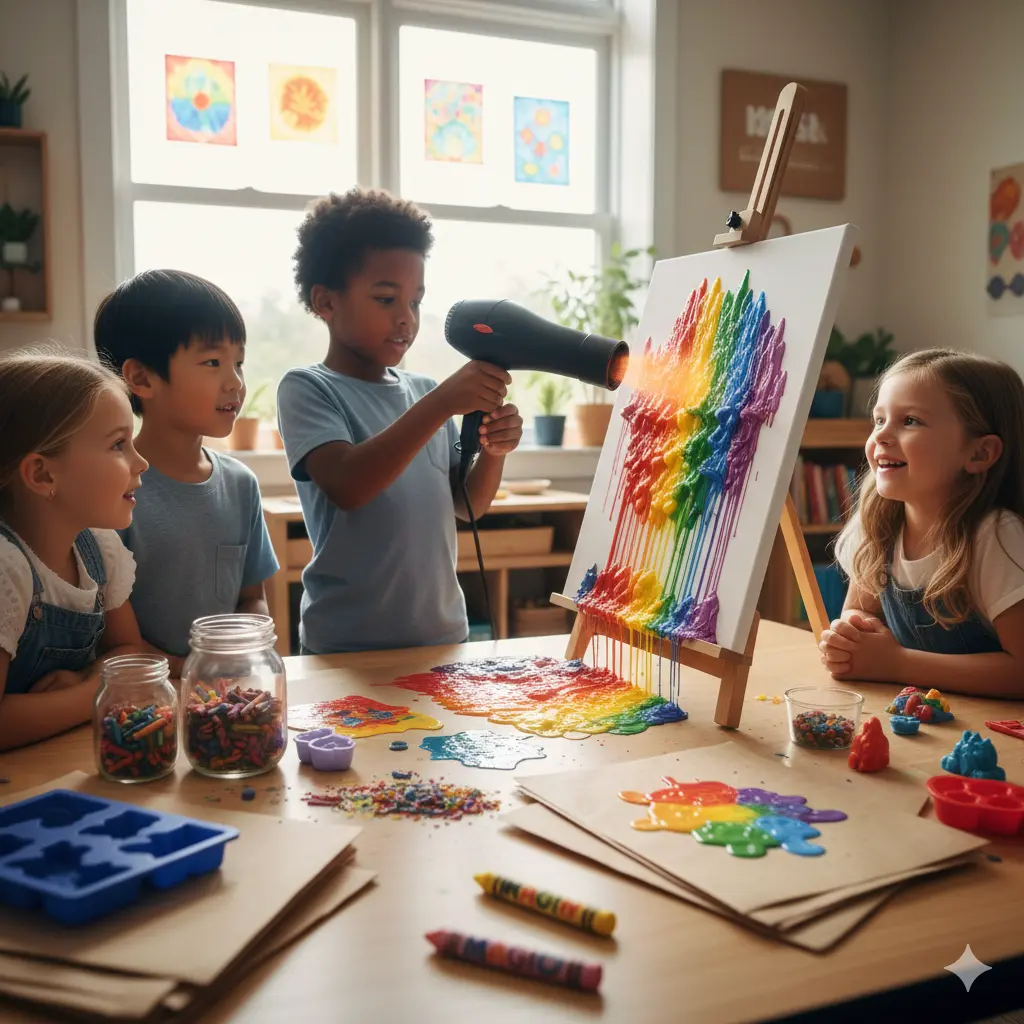
2. Rainbow Crayon Canvas (The Classic)
This is perhaps the most famous crayon craft, and for good reason—it’s mesmerizing to watch!
- How to do it: Line up your crayon stubs at the top of a canvas in a color gradient. Use a hot glue gun to secure them.
- The Melt: Tilt the canvas upward and use a hair dryer to blow heat onto the crayons. As they melt, the wax will drip down the canvas, creating a vibrant rain effect.
3. DIY “New” Rainbow Crayons
Don’t buy new crayons; make custom-shaped ones!
- Method: Peel the wrappers off your broken bits and place them into silicone baking molds (stars, hearts, or dinosaurs work great).
- Baking: Place them in the oven at 110°C (230°F) for about 10–15 minutes until fully liquid. Let them cool completely before popping them out. You now have chunky, multicolored crayons that are easy for toddlers to grip.
4. Crayon Shaving Suncatchers
Brighten up your windows with a “stained glass” effect.
- Steps: Grate your crayon bits using a cheese grater (dedicated to crafts!). Sprinkle the shavings between two sheets of waxed paper. Melt with an iron, then cut the resulting sheet into stars, hearts, or geometric shapes.
- Display: Use a hole punch and some string to hang them where they can catch the afternoon sun.
5. Crayon Resist Secret Messages
This is a classic “magic” trick for kids learning to write.
- Technique: Use a white crayon to draw a picture or write a message on white paper. It will be nearly invisible.
- The Reveal: Have your child paint over the paper with watercolors. The wax prevents the paint from sticking, making the secret message “pop” out from the background.
6. Texture Rubbing Landscapes
Broken crayons are actually better for rubbings because you can use the flat side.
- Activity: Place interesting textures (leaves, coins, lace, or textured wallpaper) under a piece of thin paper. Rub the side of a crayon stub over the paper to reveal the hidden patterns.
- Art Project: Combine different leaf rubbings to create a vibrant autumn forest scene.
7. Pointillism with Melted Tips
Pointillism is the art of creating a picture using small dots.
- The Process: Lightly touch the tip of a crayon to a warm surface (like a candle flame or a warm lightbulb—adults only!) just enough to soften the wax.
- The Art: “Dab” the softened tip onto cardstock to create thick, embossed dots. This creates a beautiful, tactile texture that looks like an oil painting.
8. Painted Crayon Rocks
Turn boring garden stones into “pet rocks” or paperweights.
- Method: Heat clean stones in the oven at 100°C for a few minutes until they are hot to the touch (but not burning).
- Crafting: Touch the crayon stubs to the hot rock. The wax will melt instantly, allowing you to “paint” the rock with swirling patterns that harden into a glossy finish.
9. Crayon Etching (Sgraffito)
This is a fun, multi-layered process that keeps kids busy for hours.
- Layer 1: Color a thick layer of bright rainbow colors over a piece of cardstock.
- Layer 2: Cover the entire rainbow layer with a thick coat of black crayon or black oil pastel.
- The Etch: Use a toothpick or a wooden skewer to “scratch” a design into the black layer, revealing the bright rainbow colors underneath.
10. Melted Crayon Christmas Ornaments
If you have clear plastic or glass ornaments, this is a must-try.
- Steps: Drop a few small crayon shavings inside the ornament. Use a hair dryer to heat the outside of the ornament while rotating it. The wax will swirl inside, creating a “marble” effect.
11. Crayon-Dipped Birthday Candles
Customize plain white candles for a party!
- Method: Melt crayon bits in a tall, narrow tin can placed inside a pot of simmering water (a double boiler).
- The Dip: Briefly dip the bottom of a white candle into the colored wax. This creates a “dipped” aesthetic that is very trendy in home decor.
12. “Sand” Art with Crayon Shavings
If you have a lot of one color, grate it down until it looks like sand.
- Activity: Apply glue to a drawing in sections. Sprinkle the “crayon sand” over the glue, shake off the excess, and repeat with different colors. It creates a beautiful matte texture.
13. Personalized Crayon Names
Using silicone letter molds, melt down colors that represent a child’s personality.
- Gift Idea: These make fantastic birthday party favors or “back to school” gifts for classmates.
14. Crayon-Stained Fabric Bunting
Did you know you can use crayons on fabric?
- Steps: Draw designs directly onto white cotton fabric scraps using crayons.
- The Set: Place the fabric between two pieces of paper and iron it. The heat sets the wax into the fibers. String the scraps together to make a festive, washable bunting.
15. The “Crayon Shaving” Galaxy
On black construction paper, sprinkle white, blue, and purple crayon shavings.
- Technique: Cover with parchment and melt briefly. While the wax is still warm, use a toothpick to swirl the colors into “galaxies.” Add silver glitter while the wax is still tacky for extra sparkle.
Supply Checklist for Crayon Crafting
Before you start, make sure you have these protective and heat-related items: | Tool | Purpose | | :— | :— | | Cheese Grater | For creating “shavings” or “sand.” | | Parchment Paper | Protects your iron and surfaces from wax. | | Hair Dryer | The best tool for controlled melting. | | Silicone Molds | For reshaping stubs into new crayons. | | Cardstock/Canvas | Sturdy bases that won’t warp under the heat of the wax. |
Why Recycle Your Crayons?
Beyond the fun of crafting, these projects teach children about the lifecycle of products. In a world where we often throw things away as soon as they are “broken,” showing a child that a broken crayon is still a valuable tool is a powerful lesson.
It also encourages sensory exploration. The smell of melting wax, the sight of colors swirling together, and the feel of the embossed textures on the paper are all vital for early childhood development.