
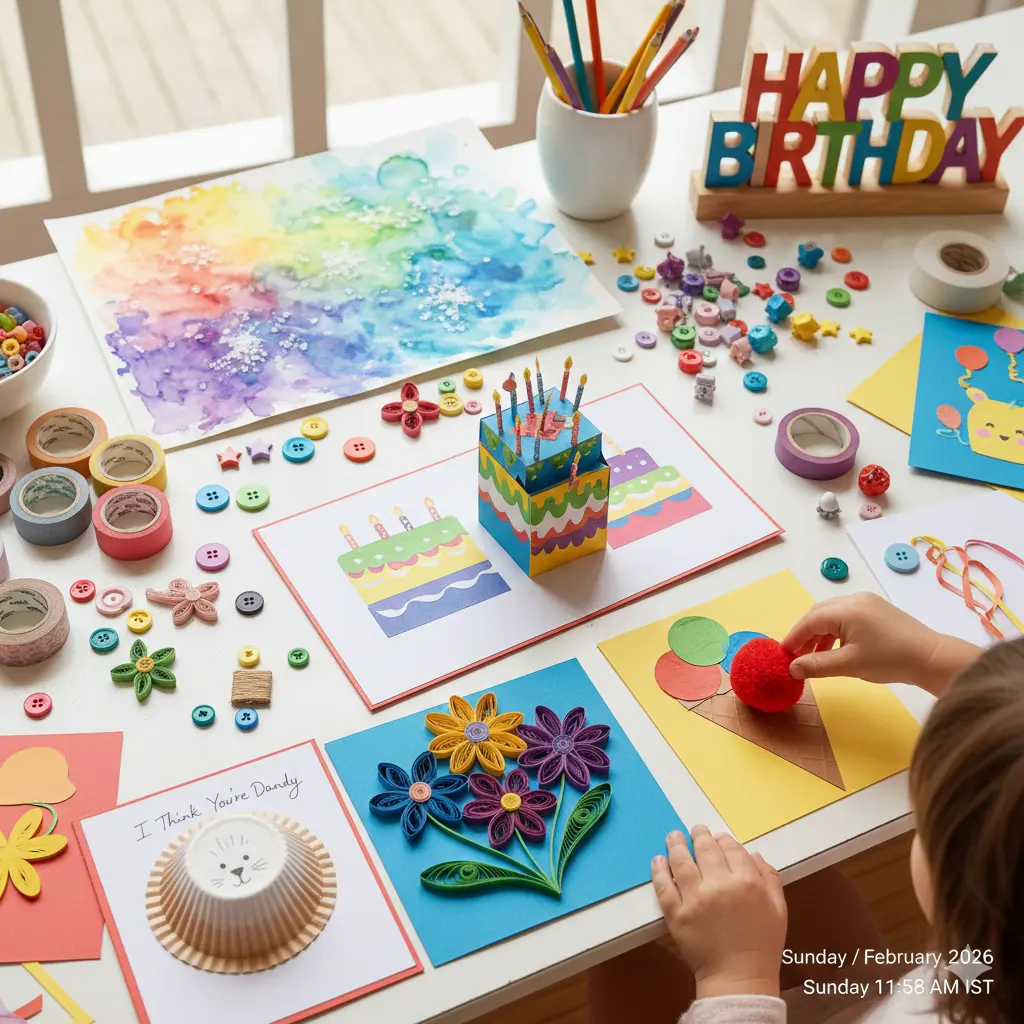
This is the ultimate showstopper. Using a few clever snips and folds, you can create a cake that literally jumps out at the recipient.
- The Trick: Fold a piece of white paper and make two parallel slits in the center. Push the flap inward to create a “step.”
- Decoration: Glue colorful paper “layers” and tiny paper candles onto the step. It’s a calorie-free surprise that looks professional but is secretly very easy!
2. Quilled Spring Bouquet Card
For kids who love texture, quilling (rolling thin strips of paper) is a fantastic technique to master.
- The Look: Roll strips of bright yellow, pink, and purple paper into tight coils. Pinch them into teardrop shapes to form petals.
- Assembly: Arrange the quilled flowers into a bouquet on the front of the card. The 3D effect gives the card a high-end, artistic feel.
3. Handprint “High-Five” Birthday Card
Perfect for younger children, this card uses their own hand as the design.
- Method: Trace the child’s hand on bright cardstock and cut it out.
- The Pun: Write “A Birthday High-Five for You!” on the front. On the inside, write a personalized message on each finger.
4. Washi Tape “Birthday Candles”
If you’re short on time but want maximum color, washi tape is your best friend.
- Design: Cut different lengths of patterned washi tape and stick them vertically on the card to look like candles.
- Finishing Touch: Draw a tiny yellow “flame” with a marker on top of each tape strip.
5. Fingerprint Balloon Bunch
This is a wonderful sensory activity for toddlers.
- The Art: Use different colored ink pads or paints. Have the child press their finger onto the card multiple times to create “balloons.”
- Detail: Once dry, use a black fine-liner to draw strings leading down to a single point.
6. The “Surprise Message” Pull-Tab Card
Inspired by the viral origami trends of 2026, the pull-tab card is interactive and fun.
- The Mechanism: Create a small envelope on the front of the card. Inside, tuck a strip of paper with a “hidden” message that reveals itself only when pulled.
7. Recycled “Waste Pen” Scroll Card
Don’t throw away those empty pens!
- Upcycling: Use two old pens as the rollers for a “royal scroll” card. Attach a long strip of paper between them and roll it up. It’s an eco-friendly way to deliver a birthday decree.
8. Crayon Resist Galaxy Card
- Technique: Write “Happy Birthday” or draw stars using a white wax crayon on white cardstock.
- The Magic: Paint over the entire card with dark blue or purple watercolors. The wax will “resist” the paint, making your message glow like stars in the night sky.
9. Button Flower Garden
- Materials: Collect spare buttons in various sizes and colors.
- Process: Glue buttons onto the card to serve as the centers of flowers. Draw stems and leaves around them for a whimsical, 3D garden.
10. Shaker Card with Homemade Confetti
Shaker cards are incredibly popular because they make a fun sound!
- How-to: Cut a window in your card and cover it with a piece of clear plastic (like from a clean food container). Fill the pocket with paper-punch confetti before sealing it shut.
Why Handmade Cards Are Better for Kids (and Parents)
| Benefit | How It Helps |
| Fine Motor Skills | Cutting, gluing, and quilling develop dexterity. |
| Literacy Skills | Writing personalized messages encourages spelling and grammar practice. |
| Sustainability | Using “best from waste” materials like old pens and scraps reduces landfill. |
| Emotional IQ | Thinking about the recipient’s favorite colors builds empathy. |
11. Scrappy Paper Layer Cake
Use up those tiny scraps of wrapping paper or construction paper by layering them to look like a tall, tiered cake.
12. Pom-Pom “Ice Cream Scoop” Card
Glue three large, colorful pom-poms on top of a brown paper triangle. It looks just like a delicious ice cream cone!
13. Rainbow Accordion Fold
Fold a long strip of paper back and forth (concertina style) and glue the ends to the inside of a card. When opened, a vibrant rainbow stretches across the middle.
14. “I Think You’re Dandy” Lion Card
Use a yellow cupcake liner as the lion’s mane and draw a cute face in the center. It’s a “dandy” way to say happy birthday!
15. Geometric Animal Shapes
Cut out basic triangles, circles, and squares from patterned paper to build a “monster” or a “cat.” It’s a great way for preschoolers to learn their shapes.
16. The “Balloon Message” Card
Write a secret message on a real balloon with a permanent marker. Deflate it and tape it to the card. The recipient has to blow it up to read their birthday wish!
17. Stitched Heart Card
For older kids, use a needle and colorful embroidery thread to “sew” a heart shape or a star directly onto the cardstock.
18. Watercolor Salt Art
While the watercolor paint is still wet, sprinkle a little table salt on it. The salt absorbs the pigment, creating a cool, textured “starburst” effect perfect for a space-themed card.
19. Photo “Pop-Out” Card
Glue a small photo of the child and the birthday friend onto a pop-up tab. It makes the card a truly personal memory.
20. Stencil & Sponge Birthday
Use alphabet stencils and a sponge to “dab” on the birthday message. This creates a soft, textured look that is much more interesting than flat marker ink.
Pro-Tips for AdX and AdSense Ready Content
When sharing these ideas on your blog, ensure you use high-quality, original photos of each step. Google’s crawlers prioritize “Helpful Content” that provides clear instructions and unique value. Avoid using AI-generated “scrap” text; instead, focus on the real-world joy of crafting and the educational benefits for children.
Conclusion: A Gift in Itself
A DIY birthday card is more than just a greeting—it’s the first gift a person opens. In 2026, taking the time to sit down with some glue, glitter, and a blank piece of paper is a powerful way to show someone they are loved.