
Why Felt is the Perfect Material for Kids
If you are new to crafting with children, felt is your best friend. Unlike silk or cotton, felt doesn’t fray when you cut it, meaning those tiny cat ears will stay sharp and neat without any extra hemming. It is also thick enough for small hands to hold easily while they practice their first stitches.
The Developmental Perks of Plushie Making:
- Fine Motor Precision: Threading a needle and following a pattern line builds incredible hand-eye coordination.
- Patience and Focus: Completing a project from a template to a finished toy provides a massive sense of accomplishment.
- Empathy through Play: Creating a “pet” encourages kids to engage in nurturing role-play.
Everything You’ll Need: The Supply List
Before we start, gather your materials. You can use any colors you like—perhaps you want to recreate your own pet!
- Felt Fabric: We recommend brown, white, pink, and black.
- Pencil or Fabric Marker: To trace the template.
- Sharp Scissors: Small embroidery scissors work best for the tiny details.
- Needle and Thread: Matching colors or a contrasting embroidery floss.
- Stuffing: Use cotton balls, poly-fill, or even tiny scraps of leftover felt.
- The Template: (Download link provided below).
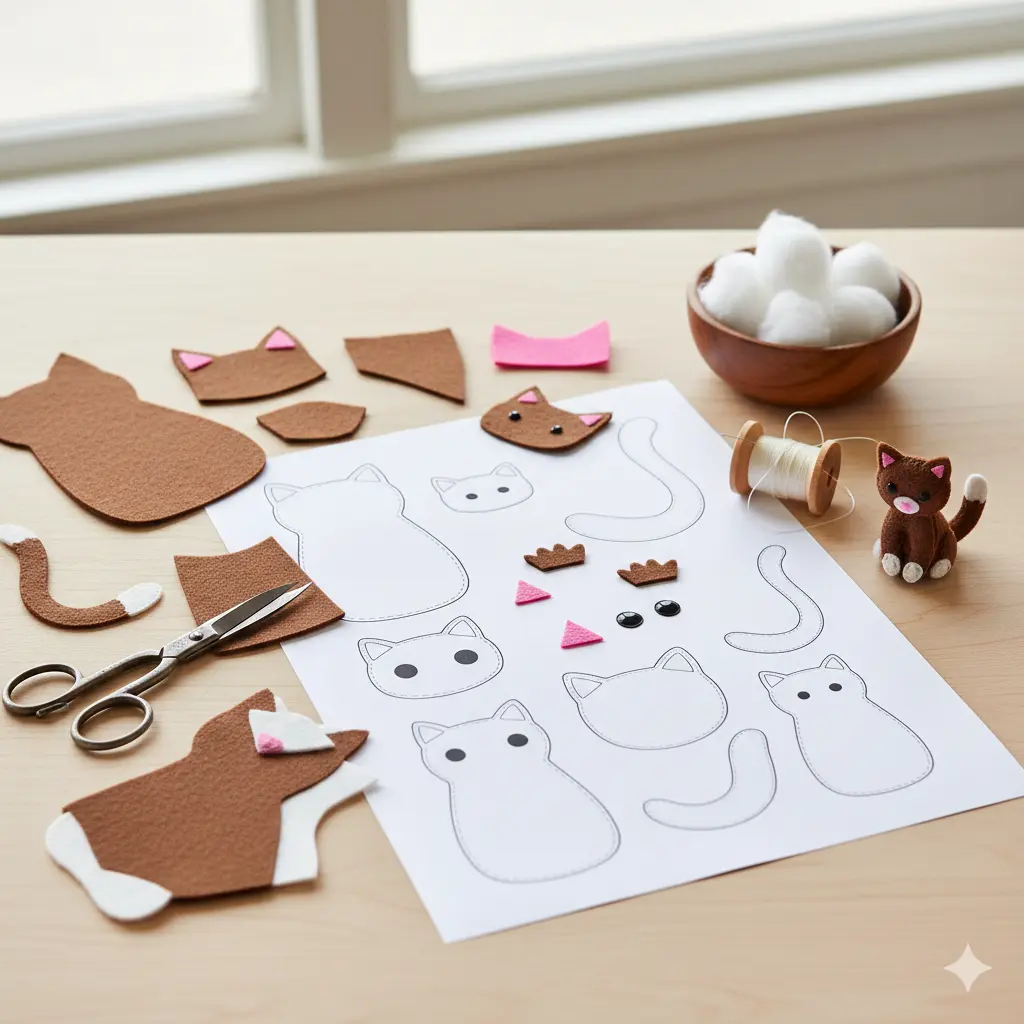
How to Make Your DIY Felt Cat Plushie
Step 1: Prepare the Template
Download and print the free cat plushie template. This comprehensive pattern includes:
- The Cat Body (Base)
- The Head
- The Half-Body (Overlay)
- Tail and Tail-End
- Details: Nose, eyes, inner ears, and fur patches.
Tip: If you are working with very young children, help them cut out the paper template pieces first, as some are quite small!
Step 2: Trace and Cut
Select your felt colors. Trace each pattern piece onto the fabric using your marker.
- Brown: Main body and head.
- White: Tail-end, muzzle, and paws.
- Pink: Inner ears and nose.
- Black: Eyes and whisker details.
Step 3: Layering the Face
Before sewing the body together, we must “build” the cat’s personality.
- Place the pink inner ears onto the brown head piece.
- Position the white muzzle and black nose in the center.
- Pro Tip: Use a tiny drop of glue to hold these small pieces in place while you stitch them down using a simple “running stitch.”
Step 4: Assembling the Body
Place the lower body pattern at the bottom of the large body base. Then, place the head cutout on the top. The head should slightly overlap the lower body part to give it a layered, 3D look.
Step 5: Stitching the Perimeter
Align the front of your cat with a second “back” body piece. Starting at the bottom, stitch around the edges.
- The Blanket Stitch: If you want a professional look, the blanket stitch is beautiful for felt.
- The Running Stitch: For beginners, a simple up-and-down stitch is perfectly fine!
Step 6: Add the Stuffing
Leave a small 2-inch gap at the side or bottom. Gently push your stuffing inside using the blunt end of a pencil. Don’t overstuff—you want your kitty to be soft and “plush,” not rock hard! Once full, stitch the gap closed.
Step 7: The Tail and Final Details
Stitch the tail-end to the tail, and then attach the tail to the back of the body. You can even add a little bell to a ribbon around the cat’s neck to finish the look.
Table: Customizing Your Felt Cat
Want to make a specific breed? Use this guide to choose your felt colors!
| Cat Type | Felt Colors Needed | Unique Feature |
| Siamese | Cream & Dark Brown | Dark “mask” on the face |
| Tuxedo | Black & White | White “bib” and white paws |
| Calico | White, Orange & Black | Random patches of color |
| Tabby | Gray or Orange | Use a marker to draw stripes |
Fun Cat Facts to Discuss While Sewing
Keep the conversation going while you work on those stitches:
- Greeting Rituals: Cats greet each other by touching noses!
- Fingerprints: Every cat’s nose print is unique, just like a human fingerprint.
- Sleepy Seniors: An average cat spends about 12 to 16 hours a day sleeping.
- Right-Pawed? Did you know male cats are usually “left-pawed” while females are “right-pawed”? See which hand your child uses more while crafting!
Frequently Asked Questions (FAQ)
Q: Do I need a sewing machine for this?
A: Not at all! This project is designed specifically for hand-sewing. It’s a quiet, meditative activity that doesn’t require any expensive machinery.
Q: My child is too young to sew. Can we use glue?
A: Yes! You can use high-quality fabric glue or a low-temp glue gun. While it won’t be a “plushie” in the traditional sense, a glued felt cat still makes a wonderful decoration.
Q: Where can I use this plushie?
A: These make excellent keychains! Simply sew a small loop of ribbon into the head before closing it up and attach a metal split ring.
Conclusion
Crafting a DIY Felt Cat Plushie is more than just a way to pass the time; it’s a way to celebrate the animals that bring so much joy to our lives. Whether you’re making this for “Happy Mew Year” or as a birthday gift for a fellow cat lover, the effort you put into every stitch shows.
Remember, there is no such thing as a “wrong” monster or a “wrong” cat—every handmade toy has its own unique character. So, grab your brown felt, download the template, and let’s get sewing!