
We have journeyed through the realms of sensory boards, backyard engineering, miniature worlds, kinetic vehicles, and acoustic wonders. But to sustain a lifestyle of purposeful DIY play, one needs more than just project blueprints; one needs a system.
This final article serves as the “Operating Manual” for the home workshop. It covers the essential safety protocols for young apprentices, the art of finding high-quality “scraps,” and the psychological framework that keeps children engaged long after the initial build is finished.
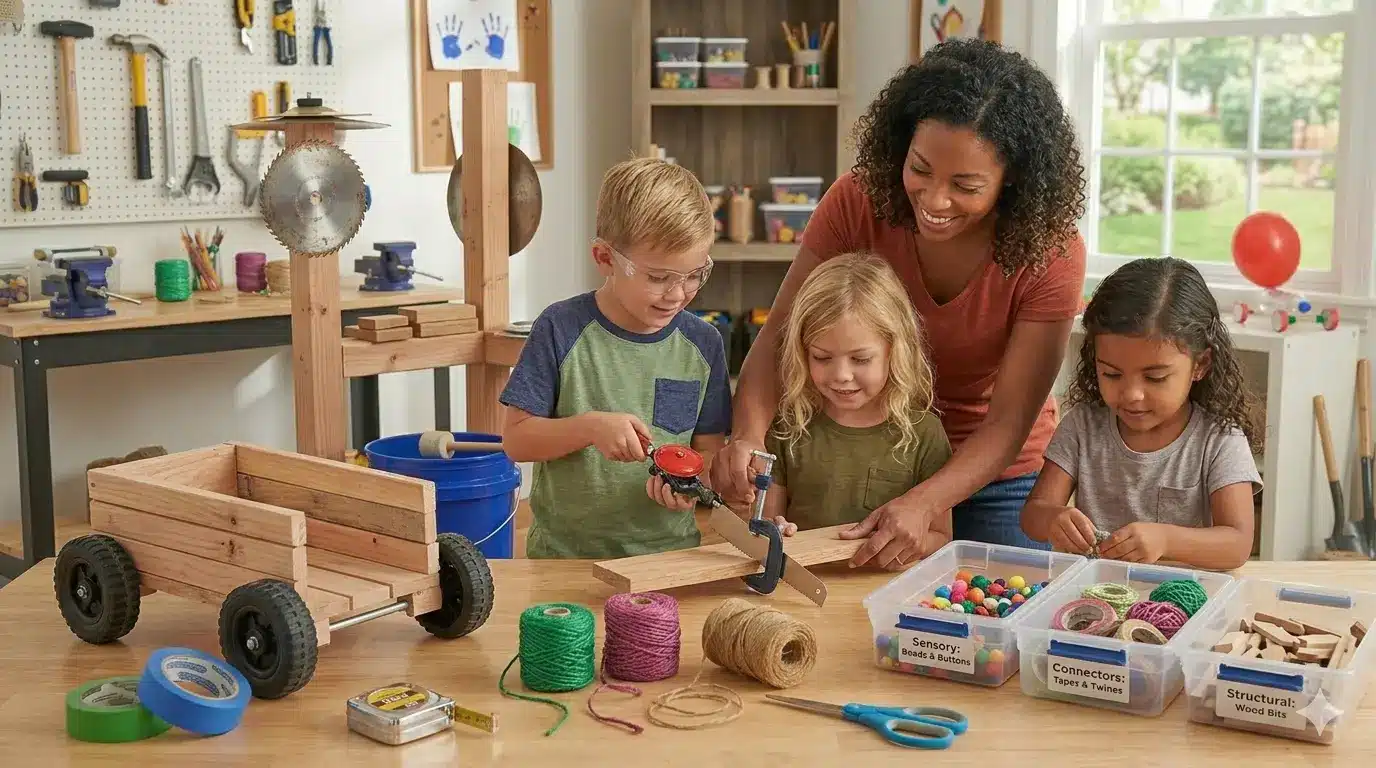
1. The Young Apprentice: A Guide to Tool Safety
The most common barrier to DIY play is fear—fear that the tools are too dangerous. However, denying a child access to real tools often results in a lack of respect for their power. By introducing “real” tools with strict protocols, we build competence and caution.
The First Five Tools (Ages 4+):
- The Stubby Hammer: A 7oz or 8oz hammer is easier for small hands to control than a full-sized framing hammer.
- The Hand Drill (Egg-Beater Style): Unlike power drills, these are manual. They teach the child that their own physical effort creates the hole.
- The Tape Measure: This is the ultimate “gateway” tool. It turns every room into a math problem.
- C-Clamps: These act as an “extra set of hands,” ensuring that a piece of wood doesn’t slip while a child is working on it.
- Safety Glasses: Establish a “No Goggles, No Work” rule from day one.
The Safety Protocol:
- The Proximity Rule: Tools are used only when an adult is within arm’s reach.
- The “Blood Bubble”: Teach children that when holding a tool, they have a “bubble” around them. No one enters the bubble while the tool is in motion.
- Dull is Dangerous: Paradoxically, a dull saw or drill bit requires more force, which leads to slips. Always provide sharp, high-quality bits and blades
2. The Art of “Creative Scavenging”
High-quality DIY doesn’t mean buying everything from the hardware store. The most interesting toys are built from Loose Parts—materials that can be moved, carried, combined, and taken apart.
Where to Find the Best “Scrap”:
- Flooring Stores: Ask for discontinued samples of hardwood, cork, or carpet tiles. These are perfectly square and pre-finished.
- Print Shops: They often have heavy-duty cardboard “cores” (the thick tubes inside paper rolls) that are much stronger than toilet paper rolls.
- Thrift Stores: Look for “solid wood” furniture that is broken. A single oak chair back can provide the materials for three different toys.
- Local Mechanics: Used tires and large bearings (cleaned of grease) are goldmines for backyard engineering.
3. Organizing the “Innovation Station”
A pile of junk is just a pile of junk until it is categorized. To foster independent play, your DIY materials must be visible and accessible.
The Bin System:
- Connectors: Tapes, glues, twines, and rubber bands.
- Structural: Cardboard, wood scraps, PVC off-cuts.
- Sensory: Fabric scraps, bottle caps, beads, and “shiny bits.”
- The “Inspiration Wall”: Use a pegboard to hang tools. Seeing the silhouette of a hammer on the wall reminds the child that the workshop is a place of order, not chaos.
4. The Science of the “Fail-Forward” Loop
In professional engineering, failure is just data. We must teach our children the same. When a DIY toy breaks, don’t throw it away. Instead, perform a Post-Mortem.
The Three Questions:
- Where did the stress occur? (Did the glue snap? Did the wood split?)
- Was it a material failure or a design failure?
- How can we “Over-Engineer” the fix?
This process develops Resilience. A child who can fix their own toy develops a “maker’s ego”—the unshakable belief that they can solve physical problems in the real world.
5. Master Resource Checklist: The “Makerspace” Essentials
If you are serious about building a high-quality DIY environment, keep these “hero materials” in stock:
| Material | Why You Need It | Best Use |
| E6000 Adhesive | Stronger and more flexible than hot glue. | Bonding metal to wood. |
| Painter’s Tape | High visibility, easy to tear by hand. | Temporary joints and “blueprints.” |
| Sandpaper (Multi-Grit) | Essential for safety and finish. | 80-grit for shaping, 220 for finish. |
| Paracord (550) | Nearly indestructible. | Pulleys, stilts, and fort-building. |
| Mineral Oil | Food-safe and non-toxic. | Protecting wooden toys and blocks. |
6. Closing the Loop: From DIY to D-I-Together
The prefix “DIY” is a bit of a misnomer in the context of parenting. It should really be DIT (Do It Together). The goal isn’t just to produce a toy; it is to share a language of creation.
When you stand at a workbench with your child, you are leveling the playing field. You are both facing the same problem: How do we make this roll? How do we make this sound? In those moments, you aren’t just a parent—you are a collaborator.
The toys we’ve discussed—the marble runs, the sensory boards, the balance beams, and the cigar-box guitars—will eventually wear out. They will be outgrown, or they will break beyond repair. But the mental framework you’ve built—the curiosity, the safety-consciousness, and the engineering logic—will remain. You aren’t just making “things”; you are making a person who knows how to build.