
In a world where children are often split between “screen time” and “real-world play,” a new frontier of DIY has emerged: the Digital-Physical (Phygital) Bridge. High-quality play in the modern age doesn’t have to reject technology; instead, it can use simple electronics and digital concepts to breathe life into physical objects.
This article explores how to craft playthings that introduce children to the world of circuits, light, and mechanical movement—turning a static toy into a living machine.
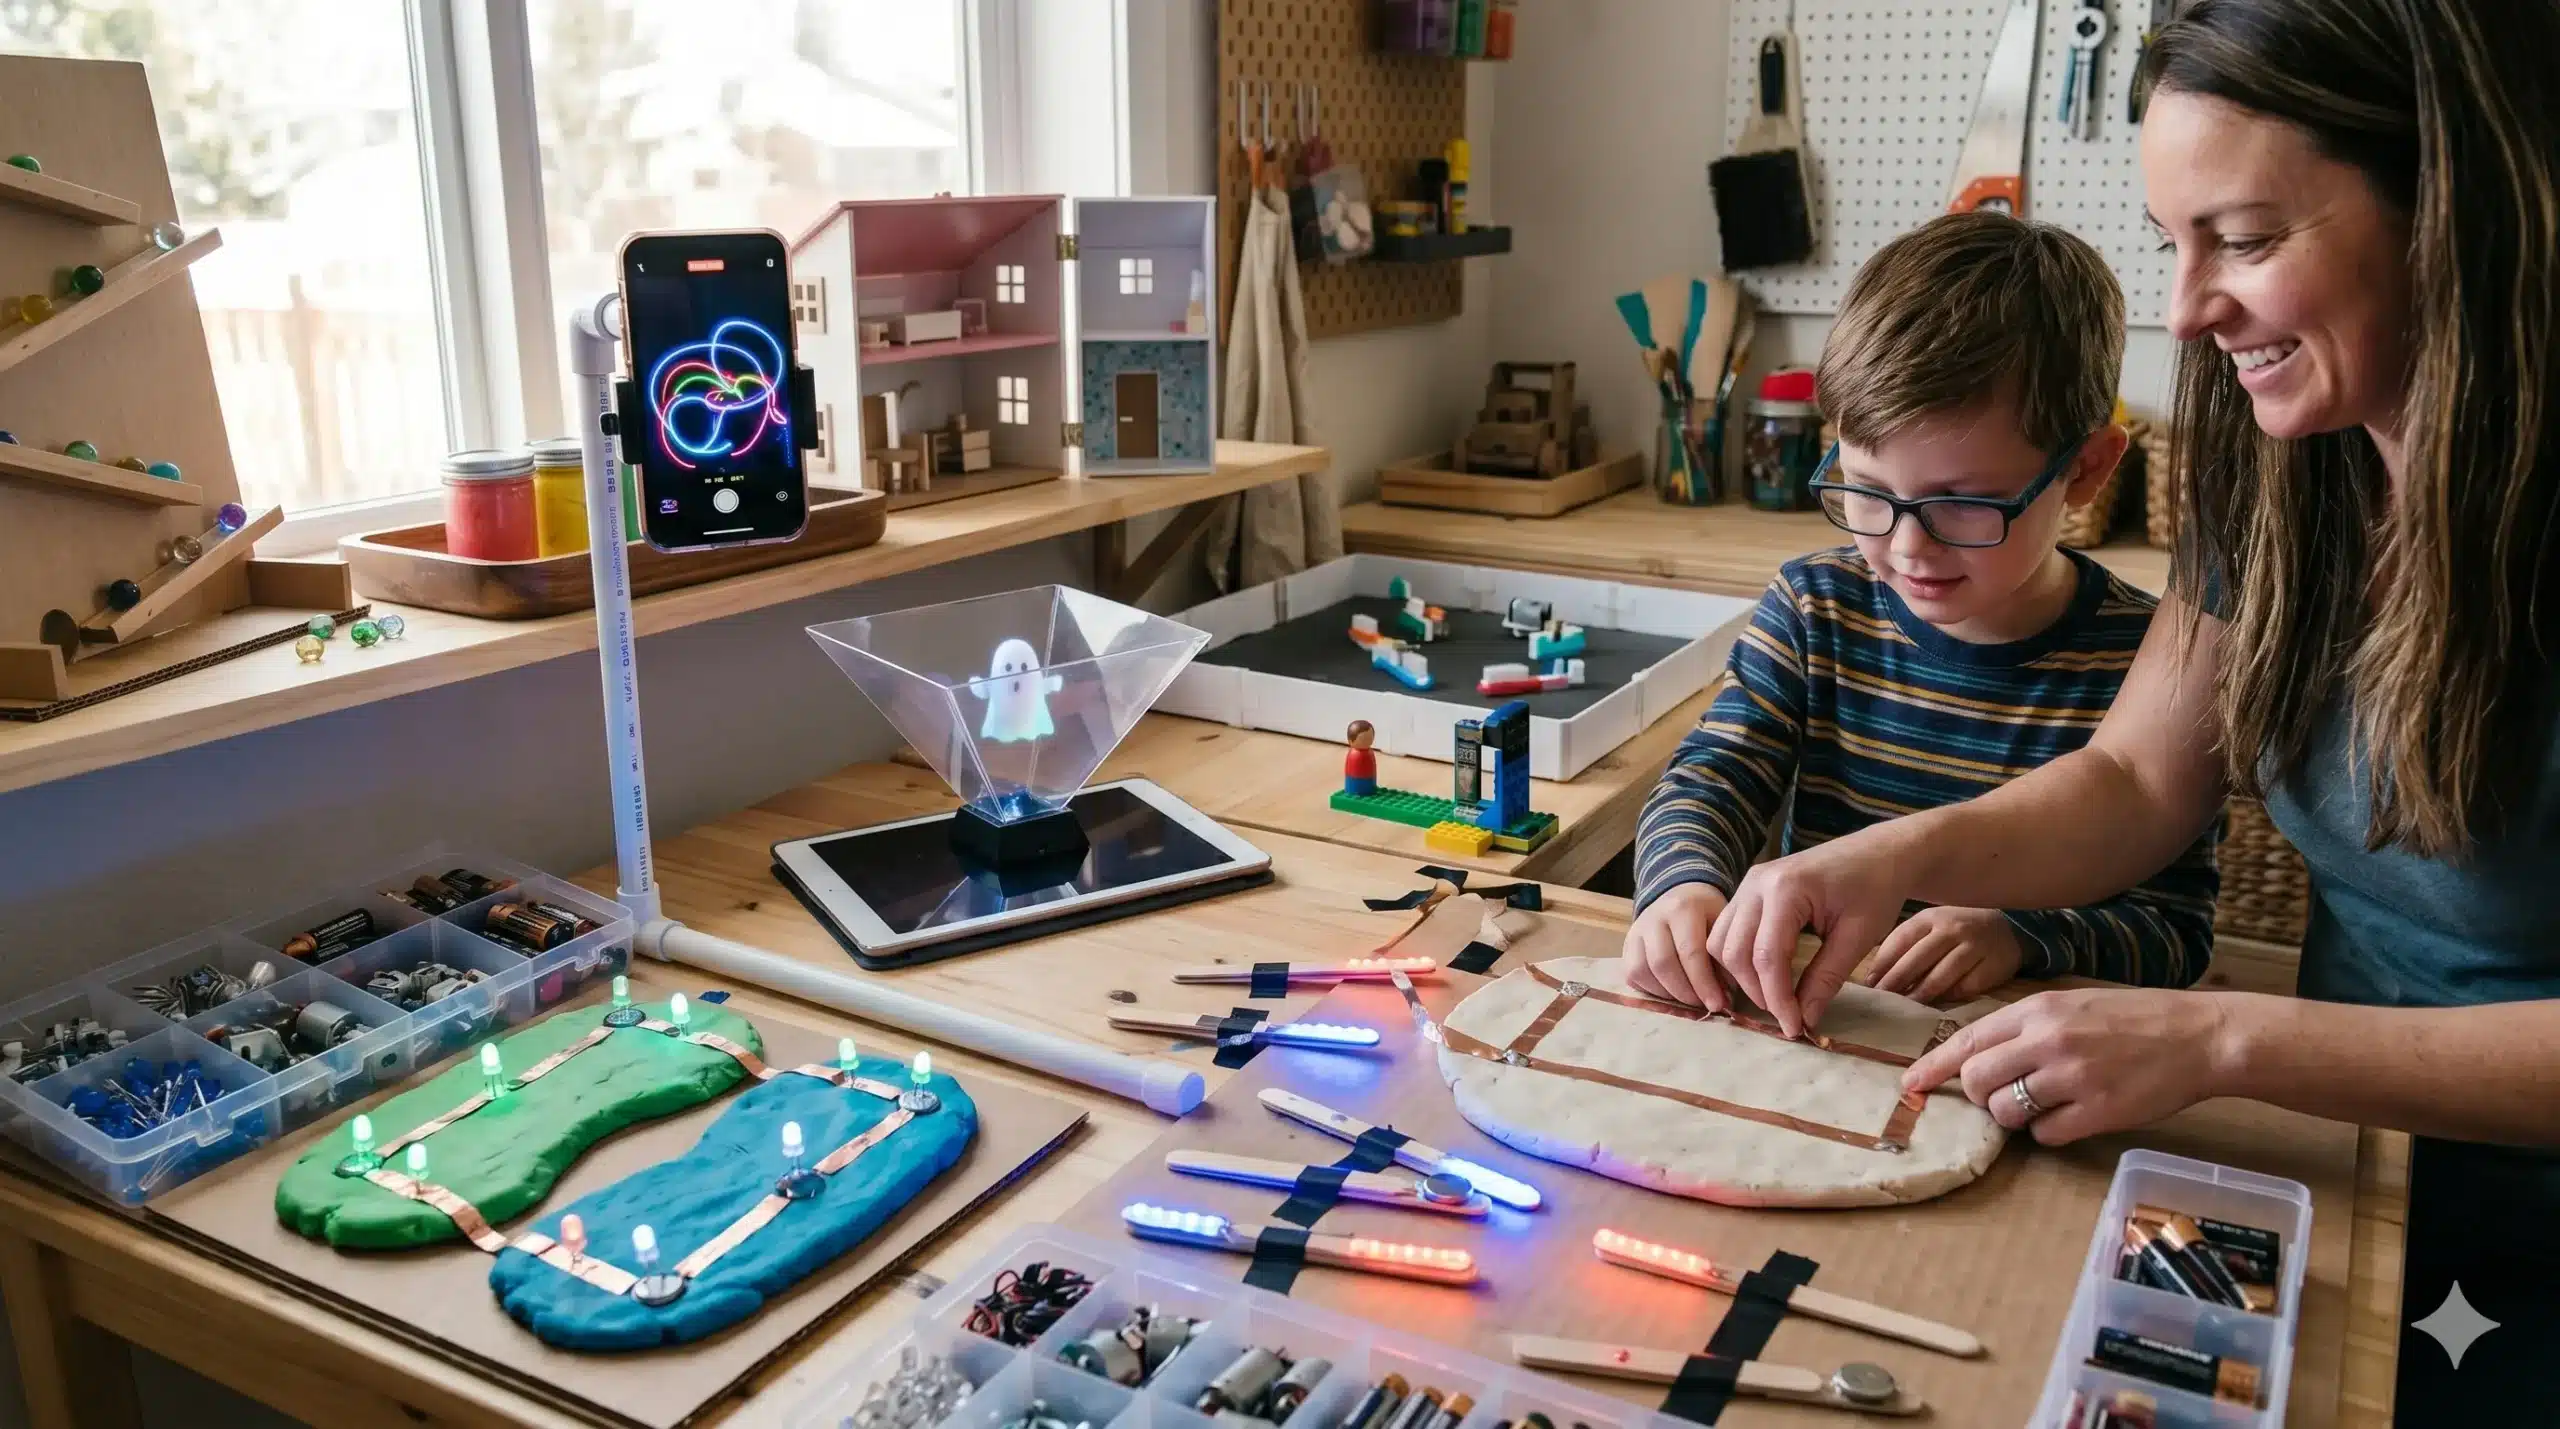
1. The “Glow-Graph”: A DIY Light-Painting Station
We often tell children to “stop staring at the light,” but in this project, we encourage them to manipulate it. This setup combines long-exposure photography concepts with physical movement.
The Project: LED “Light-Sabers” and Wands
- The Hardware: Small 3V coin-cell batteries, diffused LEDs (various colors), and electrical tape.
- The Build: Teach the child to create a “simple circuit” by sandwiching the LED legs around the battery and taping them to a popsicle stick or a clear plastic tube.
- The Play: In a darkened room, use a tablet or phone with a free “Long Exposure” app. As the child moves their DIY wands, they “draw” glowing neon sculptures in the air that appear on the screen.
The Scientific Hook: This project introduces the basics of anodes and cathodes (polarity) in electronics. If the LED doesn’t light up, they have to “debug” by flipping the battery—a fundamental lesson in troubleshooting.
2. The “Squishy Circuits” Laboratory
Why use a boring green circuit board when you can use playdough? By using dough as a conductor, children can build 3D glowing sculptures that teach them how electricity flows.
The Chemistry of Conduction
To make this work, you need two types of DIY dough:
- Conductive Dough: Use the classic salt-and-cream-of-tartar recipe from our first article. The salt carries the ions that allow electricity to pass through.
- Insulating Dough: Make a “Sugar Dough” using flour, sugar, and oil (but no salt). This dough acts as a wall that stops electricity.
How to Play: Provide a battery pack with two wire leads (4.5V is safest). If they place an LED between two pieces of salt dough, it lights up. If they put a piece of sugar dough in the middle, they can create complex “on/off” switches and insulated paths. This is electrical engineering you can squish.
3. The DIY “Hologram” Projector
You can turn any smartphone or tablet into a 3D theater using basic geometry. This project feels like “magic” but is actually a lesson in light reflection and angles.
The Build: The Plastic Pyramid
- Materials: A clear plastic CD case or a sheet of stiff acetate (transparency film).
- The Geometry: Cut four identical trapezoids. For a smartphone, the dimensions should be:
- Base: 6 cm
- Top: 1 cm
- Height: 3.5 cm
- The Assembly: Tape the four sides together to form a small pyramid with the top cut off.
- The Result: Place the pyramid upside down on your phone screen and play a “4-sided hologram video” (available for free on YouTube). The image will reflect off the four walls, appearing to float as a 3D ghost in the center of the pyramid.
4. Bristle-Bots: The Entryway to Robotics
Building a robot sounds intimidating, but a high-quality “Bristle-Bot” can be made in ten minutes using a toothbrush and a tiny motor.
The Anatomy of a Micro-Bot
- The Body: Cut the head off a standard toothbrush.
- The Engine: Use a “vibrating pager motor” (available in bulk online for pennies).
- The Power: Use a small LR44 button battery.
- The Motion: When the motor spins, its off-balance weight causes the toothbrush bristles to vibrate rapidly, “scurrying” across the table like a bug.
The Challenge: Provide a “Modular Arena” made of cardboard walls. Ask the child: “How can you add ‘antennae’ (wire) to your bot to make it bounce off walls rather than get stuck?” This is the beginning of biomimicry design.
5. Stop-Motion Animation Studio
Every DIY toy mentioned in these articles—the peg people, the cardboard cars, the clay sculptures—can be the star of its own movie. A DIY animation studio gives children a sense of directorial agency.
Setting Up the Studio:
- The Rig: Build a phone-holding arm out of LEGOs or PVC pipe to ensure the camera never moves (the #1 rule of stop-motion).
- The Backdrop: A “Green Screen” made from a single sheet of bright green poster board. This allows children to use apps to swap out the background for outer space or the deep sea.
- The Technique: Teach the “12 Frames Per Second” rule. If they want their DIY car to drive across the table, they must take 12 tiny photos for every one second of film.
Safety and Ethics in Tech Play
When integrating technology into DIY play, a few “High-Quality” standards apply:
- Battery Literacy: Always teach children that batteries are never to be put in mouths. Store button cells in a locked container.
- Screen as a Tool, Not a Destination: In these projects, the screen is a “sensor” (for the hologram) or a “recorder” (for stop-motion). It is an active tool, not a passive distraction.
- The “Black Box” Rule: Encourage children to open up (broken, unplugged) electronics. Demystifying what is inside a computer or a toy helps them feel like masters of technology rather than just users of it.