
When we look at the masterpieces of art history—Michelangelo’s David with its lifelike veins, Rodin’s The Thinker lost in eternal contemplation, or Picasso’s abstract Guitar—it is easy to feel a sense of overwhelming awe. How does a human hand take a raw, shapeless material and transform it into something that speaks to the soul? These sculptures serve as profound proof of human talent and patience.
While we might not all be destined to carve marble in a Renaissance studio, the impulse to create and shape remains within us all. For children and beginners, clay is the perfect gateway into the world of three-dimensional art. It is forgiving, tactile, and incredibly rewarding.
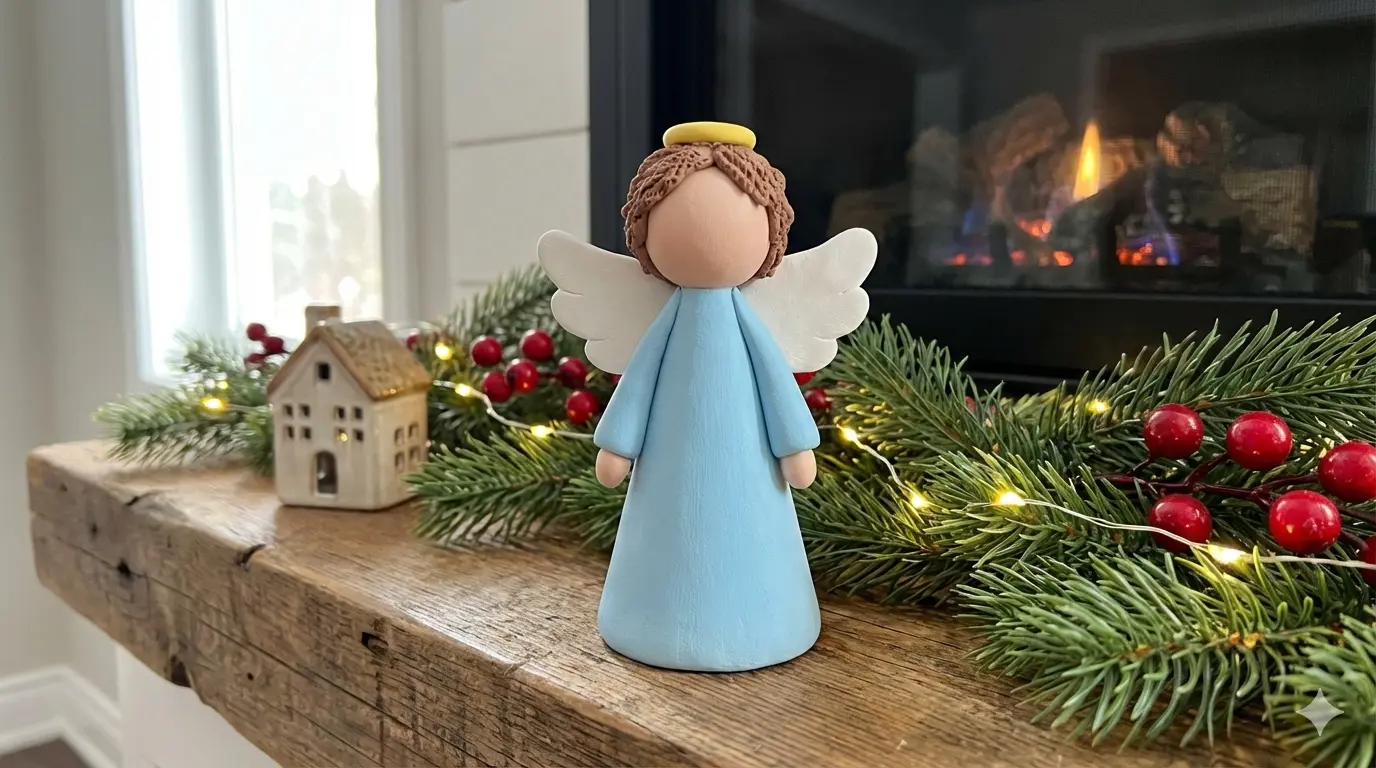
Since the festive season is upon us, there is no better way to channel that inner sculptor than by creating something celestial. Today, we’re going to walk through an Adorable Clay Angel Craft that is simple enough for kids but elegant enough to earn a permanent spot on your holiday mantle.
Why Sculpting with Clay is Great for Kids
Before we dive into the “how-to,” let’s talk about the “why.” Beyond making a cute decoration, working with clay offers several developmental benefits for young creators:
- Fine Motor Development: Rolling, pinching, and smoothing clay strengthens the small muscles in the hands and fingers, which is essential for writing and dexterity.
- Sensory Exploration: The cool, damp feel of air-dry clay or the squishy, airy texture of foam clay provides a calming sensory experience.
- Spatial Awareness: Sculpting helps kids understand 3D forms, proportions, and how objects occupy space.
- Patience and Persistence: Unlike drawing, where a line is permanent, clay allows you to mash it back down and start over until it’s just right.
The Masterpiece Toolkit: Supplies Required
To make our angel, we recommend using air-dry clay or foam clay. Air-dry clay is traditional and dries to a stone-like finish, while foam clay is ultra-light, vibrant, and bounces slightly even after it sets.
Essential Materials:
- Air-dry clay or foam clay: You’ll need light blue (for the gown), flesh tone or white (for the face), yellow or brown (for hair), and white (for the wings).
- Clay crafting tools: A plastic needle tool or even a toothpick for fine details.
- Clay rolling board: Or an acrylic board to keep your table clean.
- Clay rolling pin: A small plastic one works best, but a smooth glass or PVC pipe can also work.
- A small bowl of water: (Only if using traditional air-dry clay) to smooth out any cracks.
Step-by-Step Tutorial: Crafting Your Clay Angel
Step 1: Creating the Celestial Body
The base of our angel determines her height and stability. We’ve chosen a serene light blue for the gown.
- Take a generous chunk of light blue clay (about the size of a large plum) and roll it into a smooth ball between your palms. This removes any air bubbles.
- Once you have a perfect sphere, start rolling it into an oval or a teardrop shape.
- Apply more pressure to one end of the oval to make it pointier and narrower. The wider, rounded end will be the base.
- Pro Tip: Gently tap the wide base against your rolling board to flatten it. This ensures your angel stands upright on your mantle without wobbling!
Step 2: Sculpting the Arms
- Take a smaller chunk of the same light blue clay.
- Roll it into a thin “snake” or log shape.
- Cut the log in half to ensure you have two arms of equal length.
- Attach them to the “shoulders” (the narrower part) of the body. You can pose them as if she is praying or holding a small star.
Step 3: The Head and Face
- Select your flesh-toned or white clay and roll a small, perfect sphere. It should be roughly one-third the size of the body.
- Place the head on top of the narrow point of the body. If using air-dry clay, you may need a tiny dab of water to act as “glue.” If using foam clay, the pieces will naturally bond together.
- The Face: Use your needle tool or a toothpick to gently poke two small holes for eyes. If you want her to look extra “kawaii,” you can use tiny black beads or even a small dot of black marker once the clay is dry.
Step 4: Adding the Hair
- Whether you want golden blonde tresses or chocolate brown curls, take your chosen clay and roll out several very thin “snakes.”
- Drape them over the head one by one. You can make them long and flowing or short and bobbed.
- Detailing: Use your tool to press light lines into the clay to give it the texture of individual hair strands.
Step 5: The Angel’s Wings
An angel isn’t complete without her wings!
- Roll out a piece of white clay using your rolling pin until it is about 3mm thick.
- You can free-hand two heart shapes or use a heart-shaped cookie cutter.
- Turn the hearts sideways and attach the “points” of the hearts to the back of the angel’s body.
- Feather Texture: Use your tool to press small, overlapping “U” shapes into the wings to mimic feathers.
Step 6: The Halo and Final Touches
- Roll a very thin piece of yellow or gold clay into a long string.
- Join the ends to form a small ring.
- Place it gently on top of the hair.
- If you have leftover clay, you can give your angel a small yellow star or a white book to hold in her hands.
Tips for Working with Different Types of Clay
Depending on which material you chose, your experience will differ slightly. Here is how to handle each like a pro:
If using Air-Dry Clay:
- Avoid Cracks: As this clay dries, it loses moisture and shrinks slightly. If you see a crack forming, dip your finger in water and gently “erase” the crack while the clay is still damp.
- Drying Time: This usually takes 24 to 48 hours to fully harden. Keep it in a cool, dry place away from direct sunlight, which can cause it to dry too fast and crack.
If using Foam Clay:
- Work Fast: Foam clay dries much faster than traditional clay. Keep any clay you aren’t using inside a sealed plastic bag.
- No Water Needed: Adding water to foam clay often makes it slimy and ruins the texture. It is naturally sticky enough to join pieces together.
Comparison Table: Clay Types for This Project
| Feature | Traditional Air-Dry Clay | Foam / Magic Clay |
| Weight | Heavy, feels like stone | Ultra-light, feels like marshmallow |
| Texture | Smooth, earthy | Spongy, soft |
| Coloring | Usually white/grey; needs paint | Comes in bright, pre-mixed colors |
| Durability | Can break if dropped | Flexible and bounceable |
| Best For | “Professional” looking decor | Kids’ playtime and ornaments |
Decorating Your Mantle with Your New Creation
Once your angel is dry, you can leave it as is for a “minimalist” look, or you can go all out!
- Glitter: A little bit of silver glitter glue on the wings makes them look ethereal under the Christmas lights.
- Varnish: If you used air-dry clay, a coat of glossy varnish or even clear nail polish will give it a high-end, ceramic finish.
- Personalization: Write the year or the child’s name on the bottom of the base. These make incredible keepsakes that you’ll love pulling out of the holiday box year after year.
Conclusion: You Are the Artist
Michelangelo once said, “I saw the angel in the marble and carved until I set him free.” By following this guide, you’ve done the same thing with a simple piece of clay. You’ve taken a raw material and turned it into a symbol of peace and holiday cheer.