
Imagine you’re out for a leisurely walk in the park when suddenly, a strange object falls from the sky and lands right on your head. But wait, it’s not a stray ball or a falling leaf—it’s a glowing “space egg”! To save the day, you need to get this intergalactic passenger back to its home among the stars before it hatches. The mission is clear: you need a rocket ship, and you need it ASAP!
If that sounds like the beginning of a thrilling bedtime story, you aren’t alone. Children have been fascinated by the cosmos for generations, and there is no better way to fuel that curiosity than through imaginative play and hands-on creativity.
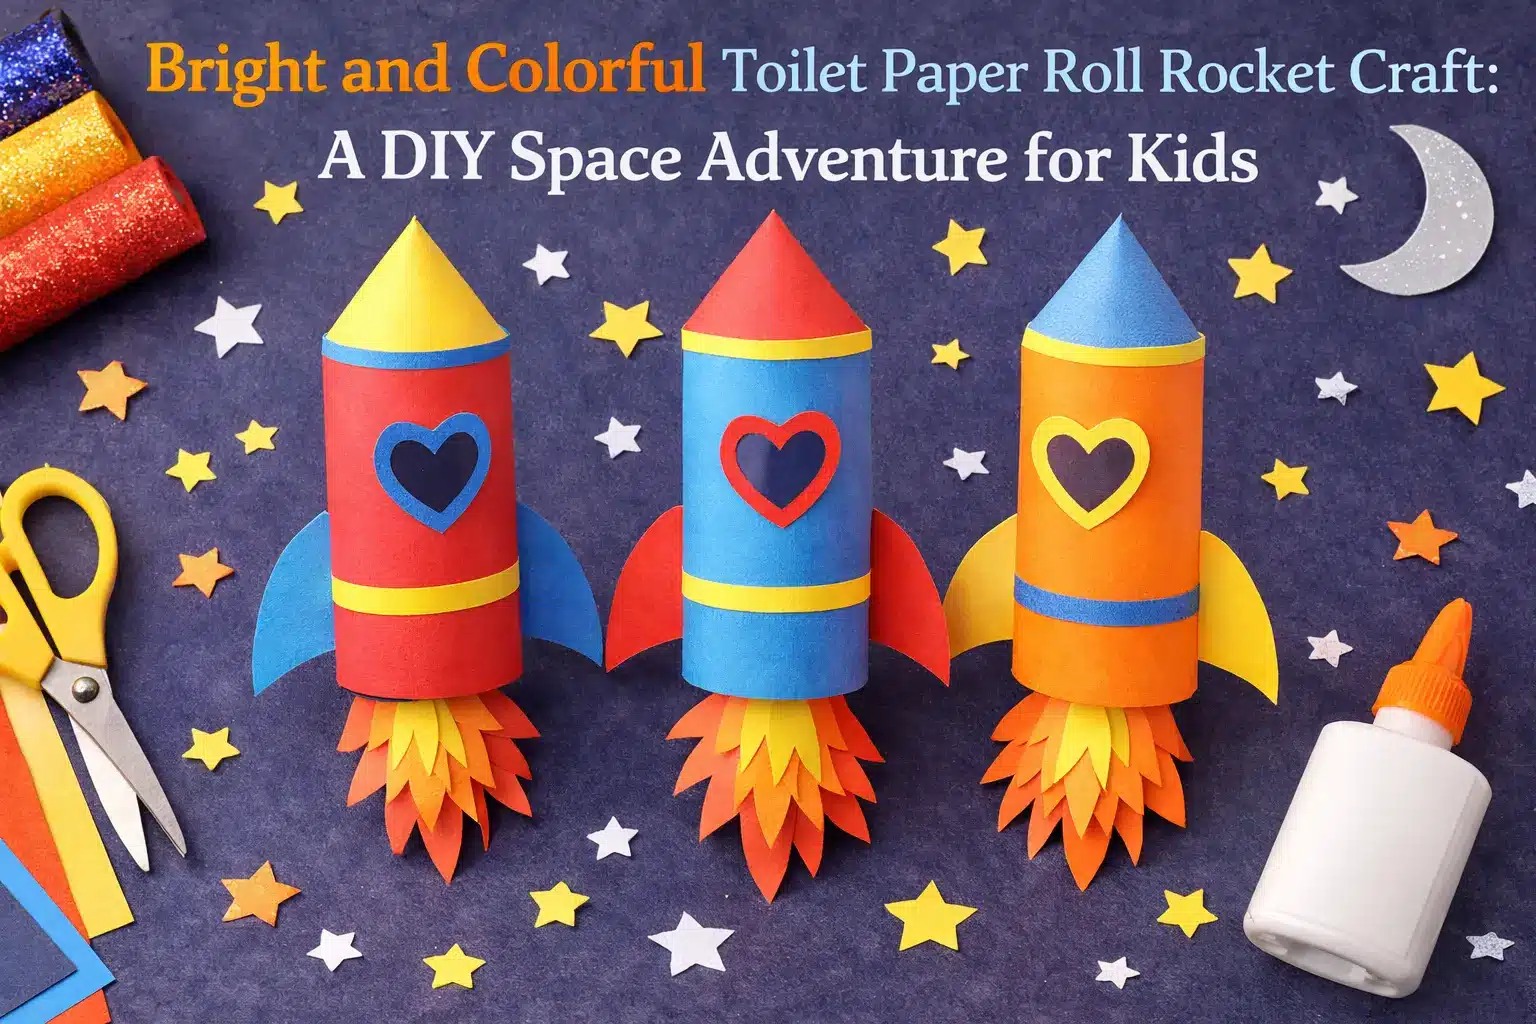
Today, we are going to show you how to turn a simple household item into a vessel for galactic exploration. This Bright and Colorful Toilet Paper Roll Rocket Craft is the perfect way to upcycle cardboard tubes while teaching kids about engineering, space travel, and the power of their own imagination.
The Educational Power of Space Crafts
Why are space-themed crafts so popular in classrooms and homes? Beyond the fun of “blasting off,” these activities provide a gateway to several core educational concepts:
- STEM Learning: Building a rocket allows parents to discuss aerodynamics, propulsion, and the solar system in a way that is easy for a child to grasp.
- Literacy Connection: Pairing a craft with a book (like the ones listed below) helps reinforce narrative structure and vocabulary.
- Sustainability: Using toilet paper rolls or kitchen towel tubes teaches children that “trash” can be repurposed into something magical, fostering an early respect for the environment.
Recommended Reading: Books to Spark the “Blast Off”
Before you start glueing and painting, set the mood with these fantastic space-themed books for young readers:
- Bizzy Bear: Space Rocket by Benji Davies: An interactive board book perfect for toddlers.
- Edward Built a Rocket Ship by Michael Rack: A story about a boy who uses his imagination to build a vessel for adventure.
- Roaring Rockets (Amazing Machines) by Tony Mitton: Excellent for kids who want to know how the “big machines” actually work.
- Pine & Boof: Blast Off! by Ross Burach: A humorous tale about friendship and reaching for the stars.
- Tiny Little Rocket by Richard Collingridge: A visually stunning book that captures the wonder of the universe.
Preparing Your Launchpad: Supplies Needed
One of the best things about this rocket craft is that it requires very little “new” material. Most of these items are likely already in your kitchen or craft drawer.
Materials Checklist:
- Cardboard Tubes: Empty toilet paper rolls or a long kitchen paper roll for a “heavy-lift” rocket.
- Craft Paper: Assorted colors (we recommend red, orange, yellow, and light blue).
- Paints: Bright acrylic or poster paints.
- Tools: Pencil, scissors, ruler, and a glue stick.
- Detailing: Sharpies or markers for adding windows and rivets.
Step-by-Step Instructions to Build Your Rocket
Follow these simple steps to transform your cardboard tube into a high-speed spacecraft!
1. Shape the Fuselage
Start with your main element: the paper roll. Gently press down on the tube to flatten it slightly. This makes it easier to draw your outline and cut through the layers of cardboard.
2. Using the Template
Download and print a rocket template. These usually include the pointed “nose” of the rocket, the fins for stability, and the circular windows. Cut out the paper outline to use as your stencil.
3. Trace and Cut
Place your paper stencil over the flattened cardboard tube. Trace the shape with a pencil. Carefully cut along these lines. Once you open the tube back up, you will see a 3D rocket shape with a built-in nose and fins!
4. Paint for “Pop”
Now it’s time to add some color. We recommend using a bold red for the nose and the fins to make them stand out. Use poster colors or acrylics for a vibrant finish. Pro-tip: Set the tube aside to dry completely before moving to the next step to avoid messy fingerprints.
5. Create the Propulsion (The Flames)
While the body is drying, prepare the “engine fire.” Trace the flame templates onto orange and yellow craft paper. Cut them out and glue the smaller yellow flame inside the larger orange one. This creates a realistic, flickering effect.
6. Design the Portholes
Every astronaut needs to see the stars! Trace the small circular “windows” onto light blue paper. Once cut out, use a dark blue marker to draw a rim around the edge to simulate a glass porthole.
7. Final Assembly
Once the paint is dry, glue your blue windows in a straight vertical line down the center of the rocket body. Finally, apply glue to the straight edge of your flame and stick it to the inside of the bottom of the tube.
Congratulations! Your rocket is ready for its maiden voyage.
Creative Extensions for Your Space Project
Don’t stop at just one rocket! You can build an entire fleet or even a mission control center.
1. The Space-Themed Birthday Activity
If you are planning a birthday party, this craft is an excellent activity. Set up a “Rocket Factory” table with pre-cut tubes and various decorations like stickers, glitter, and markers. It’s a great way to keep guests engaged, and they get to take their rocket home as a party favor!
2. Outer Space Wall Art
Glue your finished rockets onto a large piece of black poster board. Add some “stars” using white splattered paint or glow-in-the-dark stickers to create a 3D space scene for a bedroom wall.
3. More Upcycled Fun
If your child enjoyed this project, they might also like these other cardboard tube crafts:
- The Toilet Paper Roll Robot: Use silver paint and nuts/bolts for a mechanical friend.
- The Tube Pirate and Parrot: Perfect for a high-seas adventure.
- The Quirky Shark: Turn your tube into a toothy predator of the deep.
Tips for Parents and Educators
- Age Appropriateness: For preschoolers, handle the cutting of the cardboard tube yourself, as the material can be quite stiff. Let them handle the painting and the glueing of the windows.
- Measurement Practice: Use the ruler to show older kids how to measure the distance between the windows to ensure they are “equidistant.” This is a great way to slip a little math into art time!
- Discussion Points: Ask your kids, “Where is your rocket going?” or “What kind of fuel does it use?” This encourages storytelling and helps develop language skills.
Conclusion
The Bright and Colorful Toilet Paper Roll Rocket is more than just a craft; it’s an invitation to explore the unknown. It proves that with a little paint and a discarded tube, we can reach the furthest corners of our imagination. So, the next time you finish a roll of paper, don’t toss it in the bin—save it for your next mission to Mars!