
This project is a showstopper because the final result looks like high-end watercolor painting.
- The Process: Grate your leftover crayon bits into fine shavings. Place them between two sheets of wax paper and have an adult lightly run an iron over the top.
- The Magic: The colors will blend into a translucent, stained-glass effect. Once cool, trace and cut out butterfly shapes.
- Pro-Tip: Arrange a dozen of these on a white canvas or foam board to create custom 3D wall art that catches the sunlight.
2. Classic Crayon Resist Landscapes
This is a fundamental art technique that never fails to delight children.
- The Science: Wax is hydrophobic, meaning it repels water.
- The Craft: Have your child draw a detailed scene (like an underwater ocean or a starry night) using bright crayons. Then, have them paint over the entire page with thin watercolors. The crayon drawings will “pop” through the paint, staying bright and clear.
3. DIY “Rainbow” Multi-Color Crayons
Why use one color when you can use all of them at once?
- Upcycling: Take those tiny, unusable crayon nubs and peel off any remaining paper. Place them into a silicone muffin tin or candy mold.
- The Bake: Melt them in the oven at a low temperature ($110°C$ or $230°F$) for about 10–15 minutes. Once they cool and harden, you’ll have chunky, multi-colored “disco crayons” that create rainbow streaks with every stroke.
4. Texture Rubbing Nature Art
This activity encourages kids to explore the world around them.
- The Activity: Take a sheet of thin paper and some peeled crayon stubs outdoors. Place the paper over textured surfaces like tree bark, flat stones, or fallen leaves.
- The Technique: Rub the side of the crayon stub over the paper to reveal the intricate patterns of nature. This is a great way to talk about biology and patterns while creating a rustic collage.
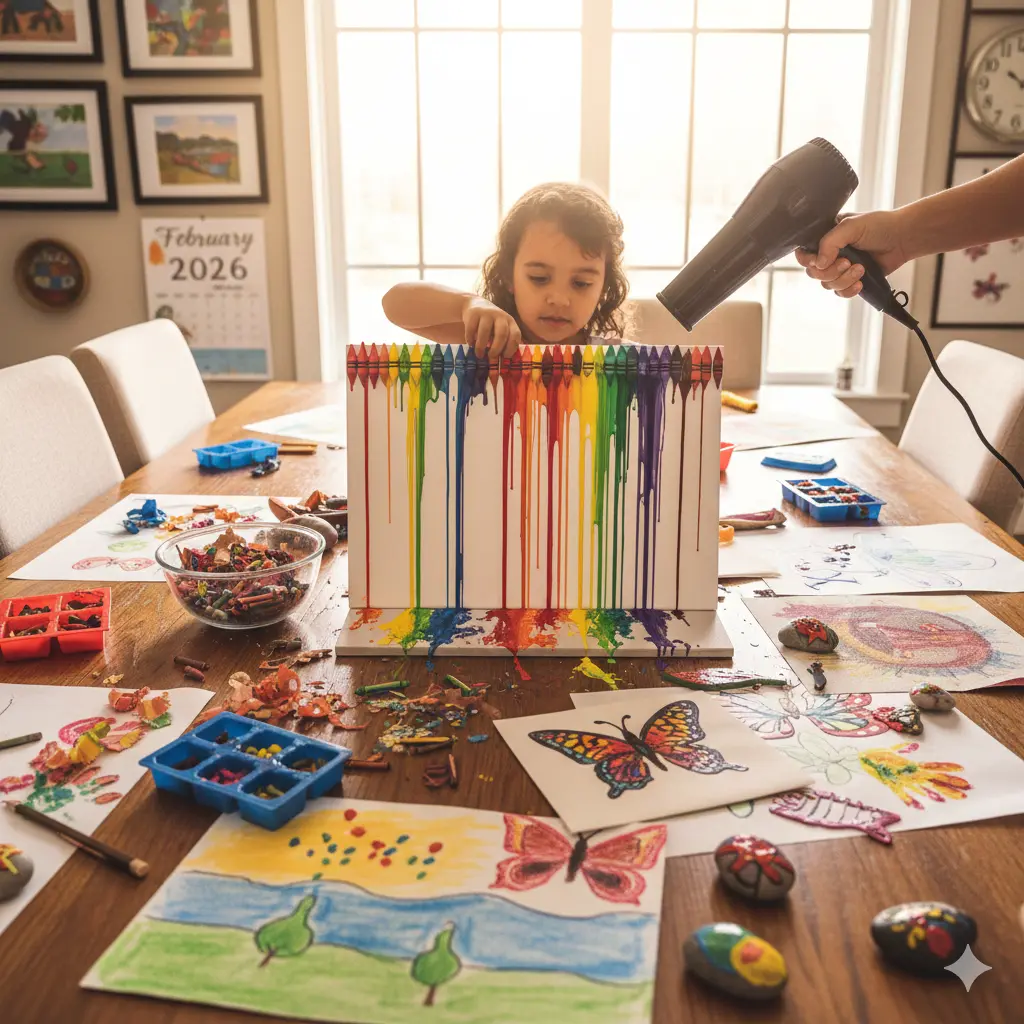
5. Crayon Drip Canvas Art
For older kids, this project results in a bold, modern piece of decor.
- The Setup: Glue a row of crayons (in rainbow order) to the top of a canvas using a hot glue gun.
- The Melt: Prop the canvas up vertically and use a hair dryer to blow hot air onto the tips of the crayons. Watch as the wax melts and drips down the canvas in long, vibrant streaks.
Why Crayon Art is the Ultimate “Best from Waste” Activity
| Benefit | Impact on Child Development |
| Sustainability | Teaches children that “broken” doesn’t mean “useless.” |
| Color Theory | Melting crayons allows kids to see firsthand how primary colors blend to create secondary ones. |
| Sensory Play | Handling wax shavings and feeling textures provides important tactile input. |
| Patience | Waiting for melted wax to harden helps develop self-regulation and focus. |
6. Suncatcher Hearts
Similar to the melted butterflies, these are perfect for window decorations.
- Design: Cut heart shapes out of your ironed wax paper sheets. Use a hole punch and some twine to hang them in a sunny window. The light shining through the colorful wax creates a warm, glowing atmosphere in any room.
7. Crayon Shaving “Stained Glass” Jars
Transform old glass jam jars into beautiful candle holders or pencil cups.
- Method: Apply a thin layer of clear glue to the outside of a jar. Sprinkle finely grated crayon shavings over the glue. Once dry, you have a textured, colorful vessel that looks like mosaic glass.
8. Sandpaper Printmaking
This is a “hidden gem” of the crafting world.
- The Process: Have your child draw a very thick, heavy-duty design on a piece of fine-grit sandpaper using crayons.
- The Transfer: Place the sandpaper face-down on a plain white T-shirt or a piece of heavy paper. An adult can iron the back of the sandpaper to transfer the wax design onto the fabric or paper. It creates a cool, grainy, vintage-style print!
9. Crayon Etching (Scratch Art)
No need to buy expensive scratch-off kits when you can make your own!
- Step 1: Cover a whole piece of cardstock with heavy patches of bright crayon colors.
- Step 2: Paint over the entire thing with a mixture of black acrylic paint and a drop of dish soap.
- Step 3: Once dry, use a toothpick to “etch” designs into the black paint, revealing the hidden rainbow colors underneath.
10. Personalized Crayon Name Art
A perfect gift for a friend or a new bedroom sign.
- The Build: Use a template to cut out the letters of a child’s name from heavy cardboard. Glue crayon pieces (sorted by color) to fill the letters. It’s a chunky, colorful, and very personal piece of art.
11. Crayon Pointillism
Teach your kids about the style of Georges Seurat.
- The Twist: Use the tips of crayons to create an entire image made only of small dots. It requires focus and helps kids understand how our eyes blend colors from a distance.
12. Leaf Skeleton Pressings
Combine science and art by finding “skeleton” leaves (leaves where only the veins remain).
- The Craft: Place the leaf under paper and use a dark crayon to rub over it. The “bones” of the leaf will appear. You can then use the crayon-resist technique (Project #2) to add a wash of green or autumnal orange paint.
13. Crayon-Decorated Easter Eggs (Year-Round!)
You don’t have to wait for Easter for this.
- Safety First: While eggs are still warm from being boiled, draw on them with crayons. The heat from the egg melts the wax instantly, creating bold, glossy designs that are much more vibrant than traditional dye.
14. Polka-Dot Crayon Painting
- The Hack: Dip the end of a crayon into a candle flame (adults only!) for just a second until the tip is liquid. Quickly “stamp” it onto paper to create a perfect, raised 3D polka dot.
15. Crayon Rocks for the Garden
- The Mission: Find smooth river rocks and warm them in the sun or a low oven. Draw on the warm rocks with crayons. The wax turns into a “paint-like” liquid that coats the rock in a permanent, waterproof seal. These make beautiful “kindness rocks” to leave around your neighborhood.
Tips for Success and Safety
- Ventilation: When melting crayons with an iron or hair dryer, always work in a well-ventilated room.
- Adult Supervision: Any step involving heat (ironing, baking, or hair dryers) must be performed or closely supervised by an adult.
- Paper Removal: To remove stubborn wrappers, soak the crayons in warm water for 5 minutes; the paper will slide right off!
Conclusion: The Joy of Upcycling
Crayons are often the very first tool a child uses to express themselves. By showing them how to reuse even the smallest “broken” bits, you are teaching a valuable lesson about creativity and resourcefulness. These 15 projects ensure that no crayon ever has to go to waste, and no rainy day has to be boring.