
We live in a world where convenience often leads to waste. From the daily newspaper to the plastic container holding our takeout lunch, we generate a staggering amount of trash every single day. With global warming creating climate crises—from the Arctic blast to untimely floods and scorching summers—the need to teach the next generation about sustainability has never been more urgent.
But here is the good news: Sustainability doesn’t have to be boring. In fact, it can be incredibly fun!
You don’t need to wait for Global Recycling Day (March 18th), Earth Day (April 22nd), or World Environment Day (June 5th) to start making a difference. By turning “trash” into “treasure,” we can teach our children the value of resources, spark their creativity, and reduce our carbon footprint all at the same time.
Have you ever stopped to eyeball how much trash your family creates in a week? Instead of sending those egg cartons, plastic shells, and tin cans to the landfill, let’s transform them. Below is a curated collection of ideas and categories to kickstart your upcycling journey. While we are highlighting specific favorites, these categories open the door to over 100+ possibilities for crafting, playing, and gifting.
Why Upcycling Matters for Kids
Before we dive into the glue and glitter, it is important to understand the why. When a child takes an object destined for the bin and repurposes it, they learn two vital lessons:
- Resourcefulness: They learn to look at an object not for what it is, but for what it could be.
- Environmental Stewardship: They understand that their actions have a direct impact on the planet.
Let’s get crafting!
Part 1: The Magic of Plastic Eggs
Plastic eggs are not just for Easter! These colorful little shells are durable, versatile, and perfect for making miniature creatures. If you have a stash of these sitting in the attic, drag them out for these adorable projects.
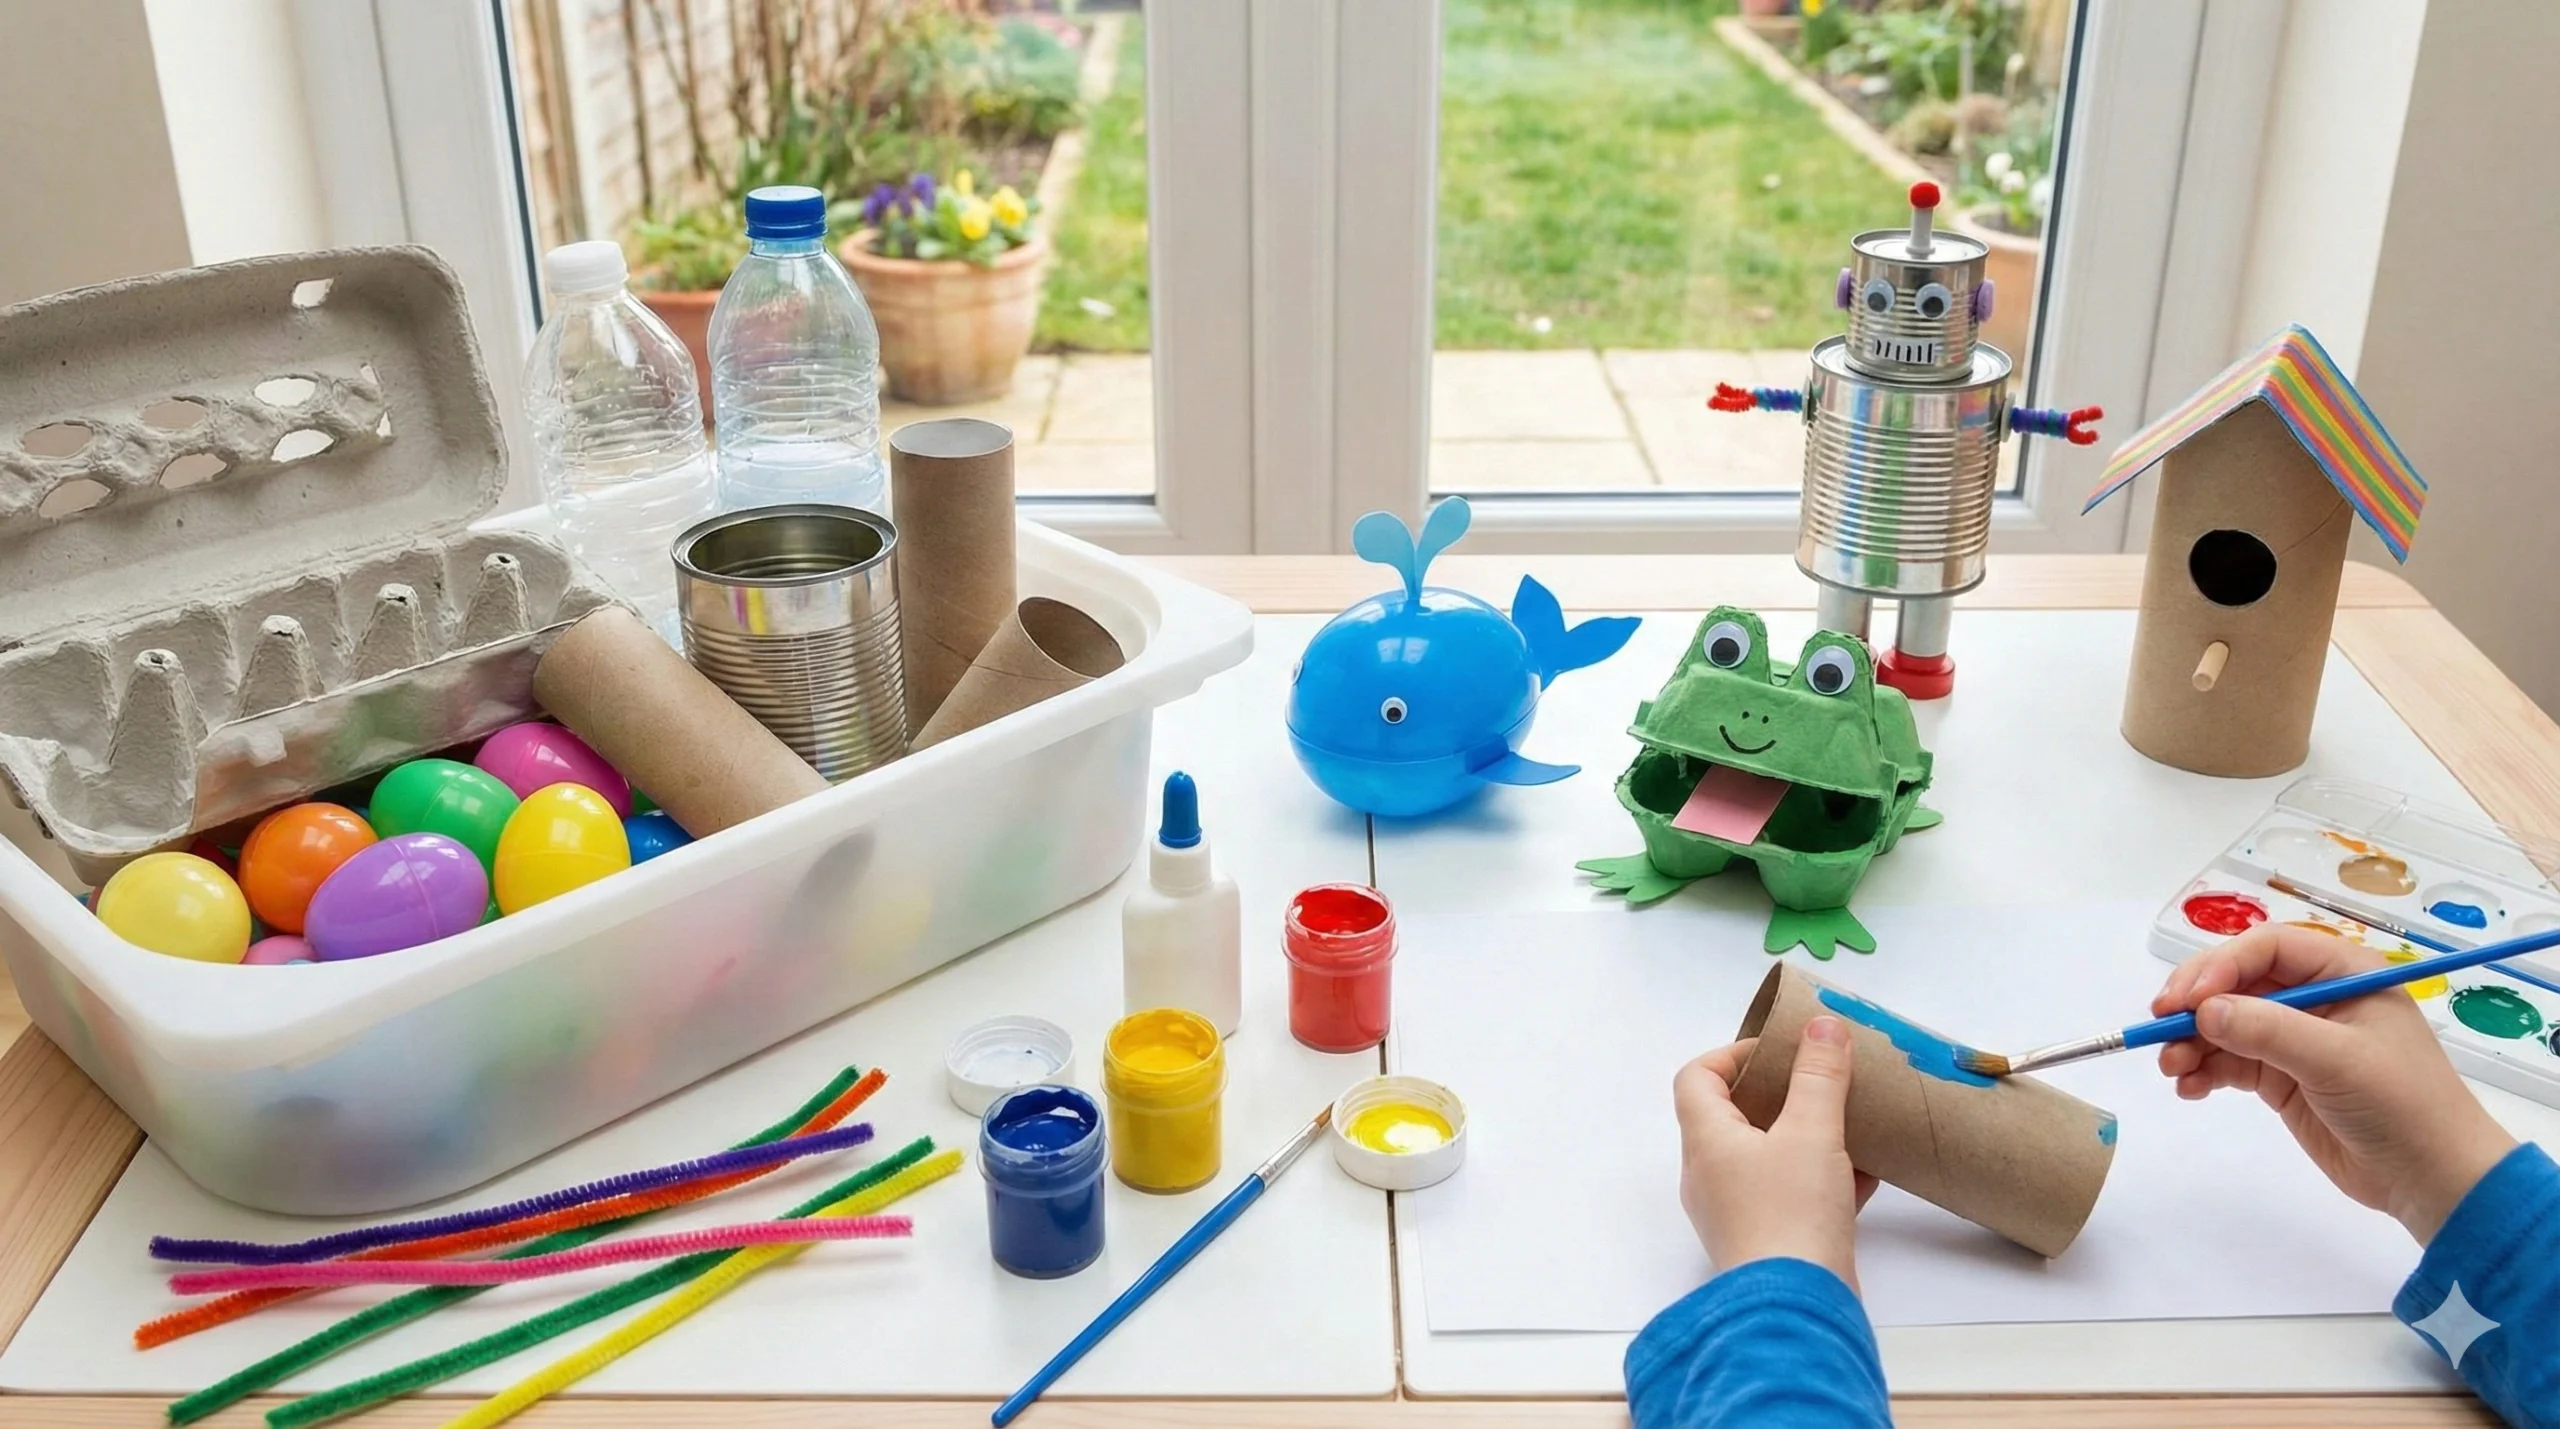
1. The Spouting Blue Whale
This is an excellent use for those bright blue plastic eggs. By turning the egg on its side, it naturally mimics the chubby shape of a whale.
- How to make it: Use blue cardstock to cut out fins and a tail. Glue them to the sides and back of the egg. The pièce de résistance is the water spout—use a blue pipe cleaner or a smallTuft of blue tissue paper coming out of the top hole. Draw on a smile, and you have a sea creature ready to swim!
2. The Ribbiting Frog
“Ribbit, ribbit!” Who is that on the lily pad? It’s a green plastic egg transformed!
- How to make it: This project is all about the eyes. Glue two green pom-poms to the top of the egg, and attach googly eyes to the pom-poms for that bulging frog-eye look. Cut a long strip of red paper and curl it around a pencil to create a long, snapping tongue. It’s simple, quick, and adorable.
3. Birds of Paradise
This craft is perfect for spring lessons about animal babies or just for fun. It allows for total creative freedom because birds come in every color imaginable.
- How to make it: Use an orange foam triangle for the beak and real feathers for the wings and tail. Mix and match colors—put pink feathers on a yellow egg or blue feathers on a purple egg. String them up with fishing line to create a mobile for a younger sibling!
4. Neon Alien Invasion
The aliens have landed, and they are surprisingly cute! This is the perfect solution for those mismatched egg halves or neon colors that don’t look like “natural” animals.
- How to make it: Use pipe cleaners to create wacky antennae. Stick on three, four, or even five googly eyes. You can even use the bottom of a plastic cup as a “flying saucer” for your egg alien to sit in
Part 2: Egg Carton Creations
Paper egg cartons are biodegradable, but they are also one of the best crafting materials in existence. Their bumpy texture and individual cups make them perfect for 3D art.
5. The Very Hungry Caterpillar
Cut a strip of the egg carton (about 4 to 6 cups long). Paint them green, with the first cup painted red for the head. Add antennas and legs using pipe cleaners. This pairs perfectly with storytime.
6. Treasure Chests
Cut out two individual cups. Hinge them together at the back using a piece of tape. Paint them gold or brown, and let the kids hide their tiny trinkets inside.
7. Fairy Bells
Cut out individual cups and paint them in pastel colors. Poke a hole in the bottom (the top of the bell) and thread a string with a bead on the end. When you hang them up, they look like beautiful blooming flowers or fairy bells.
Part 3: Tin Can Alley
Empty soup cans, bean cans, and sauce tins are sturdy and useful.
- Safety First: Always ensure the edges are smooth or covered with tape before letting kids handle metal cans.
8. The Robot Buddy
Use a large tin can for the body and smaller items (like bottle caps) for buttons. Use wire or springs for arms. It’s a great way to teach about mechanics and futuristic art.
9. Nature Wind Chimes
Paint the cans in bright, weather-resistant colors. Punch a hole in the bottom and string them up. Hang washers or beads inside so they make a clinking sound when the wind blows.
10. Desktop Organizers
Why buy a pencil holder when you can make one? Wrap the can in wrapping paper, fabric, or even coat it in glue and wrap it in yarn. It keeps the homework station tidy and looks stylish.
Part 4: Cardboard Tube Chronicles
Never throw away a toilet paper roll or paper towel roll! They are the building blocks of the crafting world.
11. Bird Feeders
This is a classic “Earth Day” activity. Cover the cardboard roll in peanut butter (or sun butter if allergies are a concern). Roll it in birdseed until fully coated. Slide it onto a tree branch. It’s a craft that gives back to nature!
12. Super Fast Race Cars
Cut a rectangle out of the top of the tube (for the driver’s seat). Paint the tube a racing color like red or blue. Use plastic bottle caps for the four wheels.
13. Safari Binoculars
Tape two rolls together side-by-side. Attach a string so they can be worn around the neck. Let the kids decorate them with camouflage patterns. Now, send them into the backyard to observe bugs and birds!
Part 5: Plastic Bottle Brilliance
Plastic bottles take hundreds of years to decompose. Let’s keep them out of the landfill.
14. Sensory Discovery Bottles
Fill a clear water bottle with water, clear glue, and glitter. Add small items like plastic letters or beads. Glue the lid shut. These are calming tools for children with anxiety or sensory processing needs.
15. Self-Watering Planters
Cut a 2-liter bottle in half. Invert the top half (with the cap on) into the bottom half. Poke holes in the cap and add soil and a plant. The water sits in the bottom reservoir and wicks up into the soil. A great science lesson!
Tips for Successful Recycled Crafting
- Create a “Trash” Stash: Keep a designated box in your craft room or garage. Wash and dry items immediately before putting them in the box to avoid smells or bugs.
- Sort by Material: Keep paper, plastic, and metal separate. It makes it easier to find inspiration when you are looking for a specific texture.
- Combine Materials: Don’t be afraid to mix media. A tin can body with cardboard tube arms makes a great sculpture!
Conclusion
Turning trash into treasure isn’t just a way to pass a rainy afternoon; it is a lifestyle change. It teaches our children that “away” isn’t a magical place where garbage disappears—it goes somewhere. By intercepting that waste and giving it a new life, we foster creativity and responsibility.
So, the next time you are about to toss that plastic egg or empty can, pause. Ask yourself (and your kids): “What could this become?”
Happy crafting, and thank you for doing your bit for our beautiful planet!
Frequently Asked Questions (FAQ)
Q: Are these crafts safe for toddlers? A: Most are safe with supervision. However, be careful with small parts (like googly eyes or bottle caps) which can be choking hazards, and sharp edges on tin cans.
Q: How do I clean containers for crafting? A: Hot soapy water is usually best. for sticky label residue, a mixture of baking soda and cooking oil works wonders to scrub it off.