
There are few things in the natural world as fascinating, mysterious, and visually striking as mushrooms. Whether you spot them popping up in your backyard after a rainy day, see them in a grocery store, or encounter them in your favorite video games (looking at you, Mario!), mushrooms capture the imagination.
Mushrooms feature prominently in fantasy and legends. They are the preferred seating for frogs, the umbrellas for tiny insects, and, of course, the cozy homes for fairies, pixies, and gnomes.
But beyond the fairy tales, fungi are incredible biological machines. They can be food, poison, natural pesticides, or even eco-friendly packaging material. It is hard to find another organism with so many alter egos!
If your children are fascinated by the “woodland aesthetic” or you are just looking for the perfect autumn or spring activity, you have come to the right place. We have curated a list of 15 Magical Mushroom Crafts for Kids that use everyday materials like paper cups, egg cartons, and rocks.
Fun Facts About Mushrooms to Share While Crafting
Before we dive into the glue and paint, let’s make this a learning opportunity. Here are some mind-blowing facts about fungi to share with your little ones:
- The Silent Giant: The largest living organism on Earth isn’t a whale or an elephant—it’s a mushroom! A single honey mushroom network in Oregon spreads across 2,385 acres.
- Nature’s Glow Sticks: Many mushroom species glow in the dark. This is called bioluminescence, and some are so bright they are nicknamed “electric mushrooms.”
- Vitamin Boost: Mushrooms are the only produce item that produces Vitamin D (the sunshine vitamin) naturally.
- Deadly Beauty: While many mushrooms are delicious, about 1% are poisonous enough to be fatal. It teaches us to admire nature but be careful what we touch!
- Eco-Warriors: Mushrooms can be used to create biodegradable packaging that decomposes in just 45 days, unlike Styrofoam which takes centuries.
Now that we know how awesome they are, let’s get crafting!
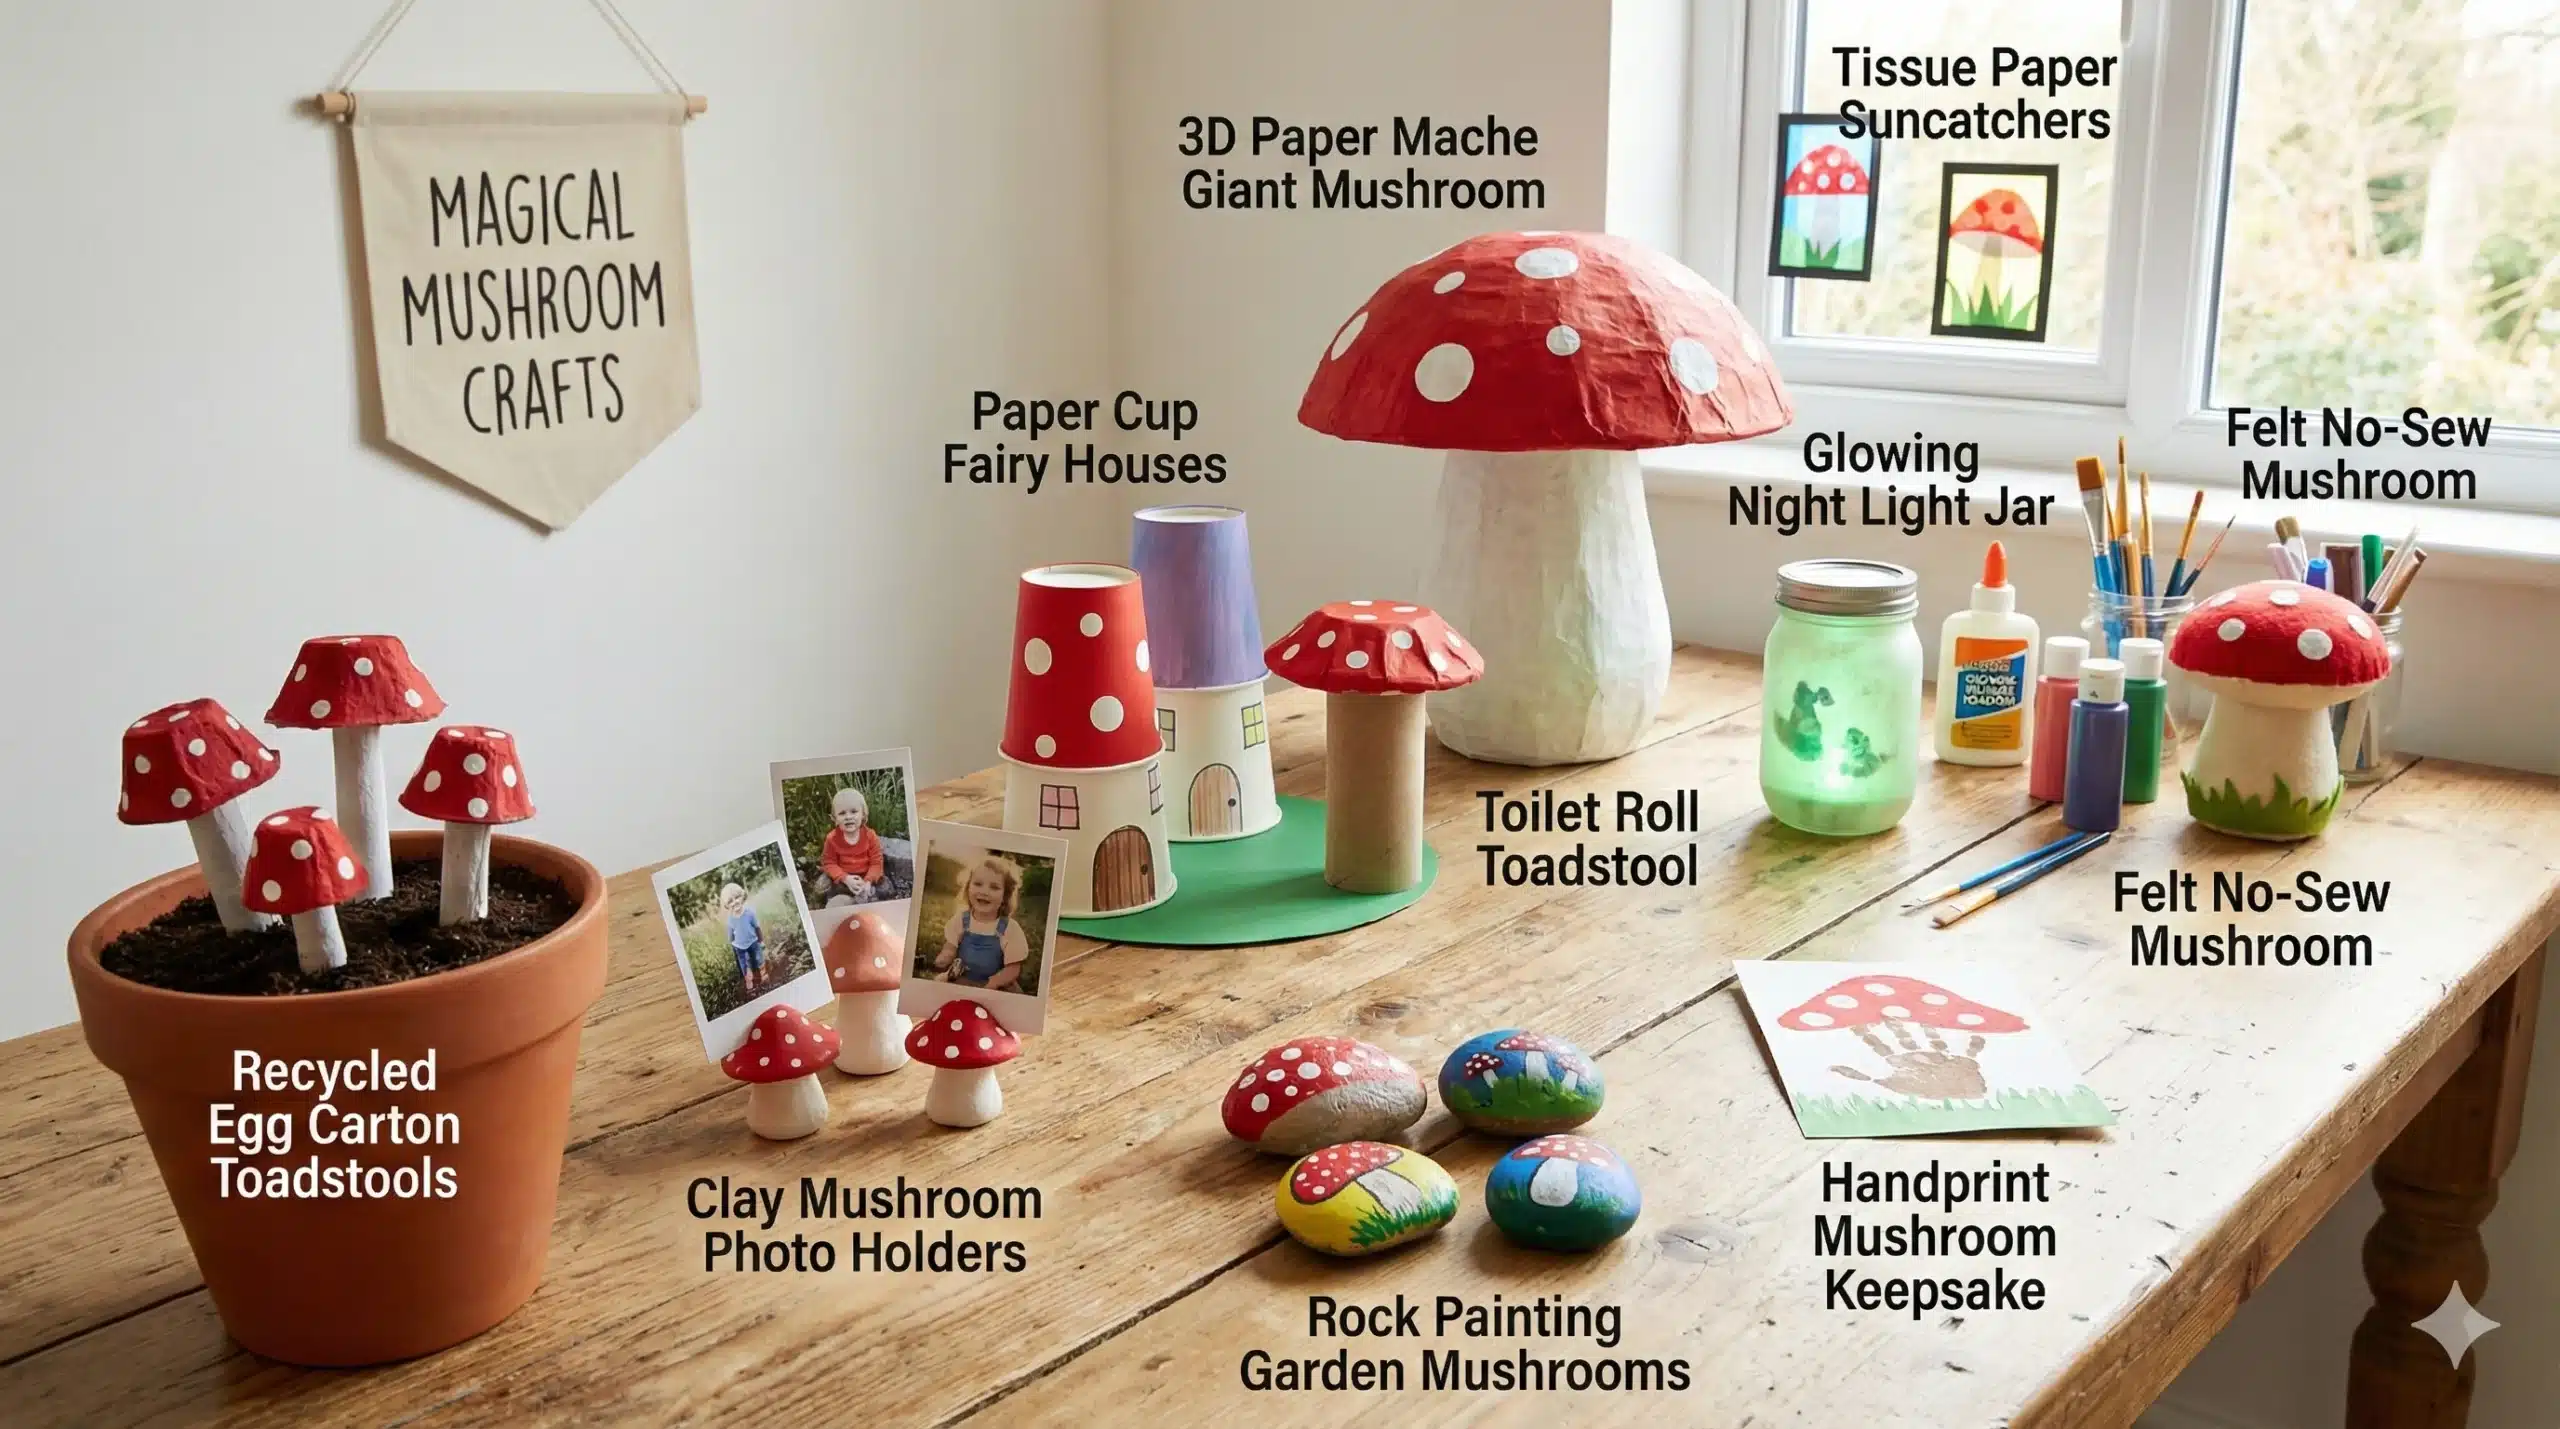
1. Recycled Egg Carton Toadstools
Mushrooms are sustainable to farm, so let’s keep that theme going with sustainable crafting!
- The Idea: Cut the individual cups out of a cardboard egg carton. These bumpy, round shapes make the perfect mushroom caps.
- How to Make It: Paint the egg carton cups bright red with white polka dots. For the stems, you can use thick craft stems (chenille sticks) or rolled-up cardstock glued to the inside of the cup. Plant them in a small pot of soil for a fake garden!
2. Clay Mushroom Photo Holders
Did you know that “toadstools” and “mushrooms” are basically the same thing? This craft makes for a wonderful gift for grandparents.
- The Idea: Use air-dry clay to sculpt a short, thick stem and a wide cap.
- How to Make It: Shape the clay into a mushroom. Before it dries, insert a spiral wire or a paper clip into the top of the cap. Once dry, paint it in whimsical colors. The wire holding the photo pops out of the top like a magical antenna!
3. Paper Cup Fairy Houses
In fantasy stories, mushrooms are often homes. Let’s build a village!
- The Idea: An upside-down paper cup serves as the house (stem), and a paper bowl serves as the roof (cap).
- How to Make It: Cut a small door and windows into the paper cup. Draw vines and flowers growing up the walls. Paint a paper bowl red or purple and glue it onto the bottom of the cup. These are perfect for playing with small figurines or LEGO people.
4. Rock Painting Garden Mushrooms
This is a classic craft that rocks—literally! It’s perfect for decorating your front porch or flower beds.
- The Idea: Turn smooth, round river stones into colorful fungi.
- How to Make It: Wash and dry your rocks. Paint the entire rock red (or your preferred color). Once the base coat is dry, use a smaller brush or a Q-tip to dab on white spots. You can place these painted rocks at the base of trees in your yard to confuse the neighbors!
5. The Polka-Dot Paper Plate Mushroom
A great project for preschoolers that helps with fine motor skills.
- The Idea: Use a standard white paper plate to create a giant mushroom cap.
- How to Make It: Cut the bottom third off a paper plate to give it a flat edge. Paint the rest of the plate red. Cut a thick rectangle from brown construction paper for the stem and glue it to the flat edge. Finally, glue cotton balls onto the red plate for fluffy, 3D spots.
6. Cork & Champagne Mushrooms
Have some corks left over from a celebration? Their shape is naturally mushroom-like!
- The Idea: Champagne corks specifically have that “bulbous” top that looks exactly like a mushroom cap.
- How to Make It: Paint the top part of the cork red and the bottom stem white. These are tiny, adorable, and stand up on their own. They look great arranged on a shelf or glued onto a wreath.
7. Toilet Roll Toadstools
Never throw away a toilet paper roll!
- The Idea: The roll acts as a sturdy stem for a taller mushroom.
- How to Make It: Paint the toilet roll white or cream. For the cap, take a red cupcake liner or a circle of red paper with a slit cut to the center (folded into a cone). Glue the cone on top of the roll. Add a door to turn it into a high-rise apartment for a pixie.
8. Handprint Mushroom Keepsake
This one is messy but makes a wonderful memory to hang on the fridge.
- The Idea: Use your child’s handprint to create the scene.
- How to Make It: Paint the child’s palm red and their fingers green. Press it onto white paper. The red palm becomes the mushroom cap. Once dry, paint a stem underneath the palm. The green fingers sticking up look like tall grass growing behind the mushroom!
9. 3D Paper Mache Giant Mushroom
For the older kids who want a project that takes a few days.
- The Idea: Create a large centerpiece mushroom using a balloon and newspaper.
- How to Make It: Blow up a balloon. Paste strips of newspaper dipped in glue/water mixture over the top half of the balloon. Let it dry to create a hard shell. Pop the balloon. Paint the shell to look like a mushroom cap and attach it to a cardboard tube stem.
10. Popsicle Stick Mushroom Frame
- The Idea: A cute triangular frame that looks like a mushroom.
- How to Make It: Glue three popsicle sticks into a triangle. This is the cap. Cover the back with red paper. Glue a fourth stick pointing down from the center of the bottom edge as the stem. You can put a photo inside the triangle or just decorate it with glitter.
11. Felt “No-Sew” Mushrooms
- The Idea: Soft, squishy mushrooms that are great for sensory play, made without sharp needles.
- How to Make It: Cut circles out of red felt and rectangles out of white felt. Use strong fabric glue or a hot glue gun (adults only) to assemble them. Stuff the inside of the stem with a little cotton or scrap fabric to make it puffy before sealing the edges.
12. Tissue Paper Suncatchers
Let the light shine through!
- The Idea: Use the transparency of tissue paper to create a glowing mushroom window decoration.
- How to Make It: Cut the outline of a mushroom out of black cardstock (leaving the inside hollow). Stick the outline onto clear contact paper. Have your child fill the sticky inside with torn pieces of red and white tissue paper. Seal with another sheet of contact paper and cut it out.
13. Muffin Liner Art
- The Idea: Cupcake liners are already pleated, mimicking the “gills” found underneath a mushroom cap.
- How to Make It: Flatten a white cupcake liner and glue it to a piece of blue paper. Cut a semicircle of colored paper and glue it over the top half of the liner. Draw a stem coming down. It looks like you are looking up at the mushroom from below!
14. Origami Mushroom
For kids who love a challenge and folding paper.
- The Idea: Turn a single square of origami paper into a mushroom without using scissors or glue.
- How to Make It: There are many simple tutorials online for this. It involves folding the paper so that one side shows the color (cap) and the white side of the paper becomes the stem. It’s a great lesson in geometry.
15. The “Glowing” Night Light Jar
Inspired by the bioluminescent mushrooms mentioned in our fun facts!
- The Idea: A jar that looks like a terrarium with glowing mushrooms inside.
- How to Make It: Use neon or glow-in-the-dark clay to shape small mushrooms. Stick them to the inside of a Mason jar lid (so they hang down) or the bottom. Add fake moss. Charge the clay under a lamp, turn off the lights, and watch your magical forest glow!
Conclusion
Whether you are teaching a lesson on nature, decorating a bedroom with a fairy tale theme, or just looking for a way to use up those extra paper plates, these 15 mushroom crafts offer something for every age and skill level.