
While the previous installments of this series explored sensory play, outdoor structures, and miniature worlds, we now move into the realm of kinetic engineering. Active DIY toys are those that require physical force—pushing, pulling, balancing, or pedaling—to function.
These projects are more than just playthings; they are lessons in mechanics, friction, and torque. When a child builds a vehicle that actually rolls or a pair of stilts that elevates their perspective, they aren’t just playing—they are mastering the physical laws of the universe.
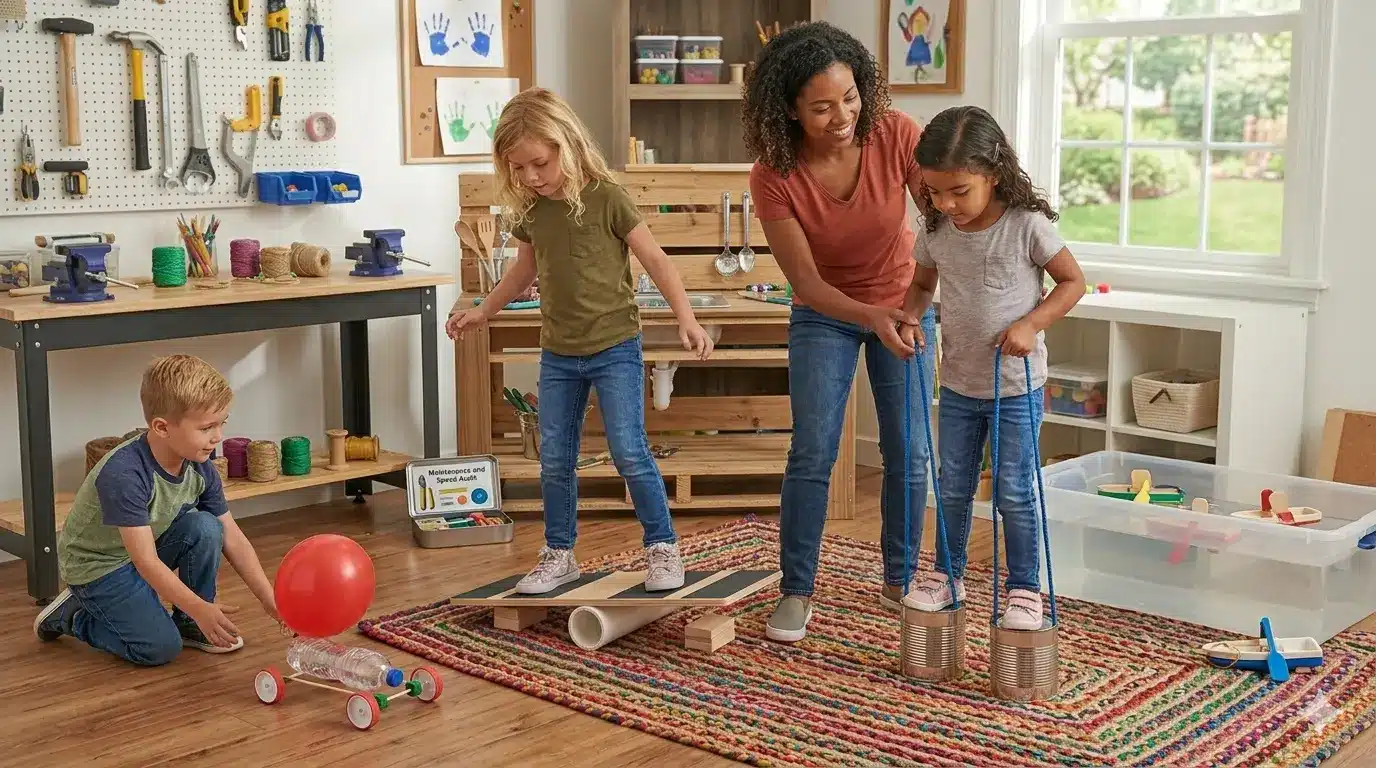
1. Project: The Classic “Tin Can” Walking Stilts
Target Skills: Vestibular balance, core strength, and tension physics.
This is a “low-tech, high-reward” project. It’s one of the simplest ways to introduce a child to the concept of center of gravity.
Materials You’ll Need:
- The Bases: Two large, empty coffee tins or industrial-sized soup cans (cleaned and edges filed smooth).
- The Line: 10 feet of heavy-duty nylon rope or paracord.
- Traction: Self-adhesive rubber grip tape (optional but recommended for indoor use).
The Build:
- Punching Holes: Use a hammer and a large nail to punch two holes near the top of each can, directly opposite each other.
- The Loop: Thread the rope through the holes and tie a secure knot inside the can. The loop should reach comfortably to the child’s waist when they are standing on the cans.
- Safety Check: Ensure the can is sturdy enough to hold the child’s weight without buckling. If the metal is thin, fill the bottom inch with quick-set concrete for a weighted, ultra-stable base.
2. Project: The Balloon-Powered Aerodynamic Racer
Target Skills: Propulsion, aerodynamics, and Newton’s Third Law.
This project turns recycled household items into a high-speed physics lesson. It is the perfect introduction to the formula:
$$F = ma$$
(Force equals mass times acceleration. The lighter the car, the faster the balloon’s “force” will move it!)
Materials You’ll Need:
- Chassis: A rectangular piece of corrugated cardboard or a lightweight plastic water bottle.
- Axles: Two wooden BBQ skewers.
- Wheels: Four plastic bottle caps.
- Engine: One large balloon and a plastic drinking straw.
The Build:
- Axle Alignment: Straws make great “bushings.” Tape two short pieces of straw to the bottom of the chassis and slide the skewers through them. This reduces friction.
- Wheel Fitting: Carefully poke a hole through the center of each bottle cap. If the cap spins on the skewer, secure it with a dab of hot glue.
- The Jet: Tape the neck of the balloon around one end of a straw using an airtight seal. Tape the straw to the top of the car.
- The Launch: Blow through the straw to inflate the balloon, pinch the end, place it on a smooth floor, and release!
3. Project: The “Balance Master” Wooden Board
Target Skills: Proprioception, ankle stability, and concentration.
Professional athletes use balance boards to train their nervous systems; for a child, it’s a “the floor is lava” survival tool.
Materials You’ll Need:
- The Deck: A 2-foot section of 3/4-inch plywood, sanded smooth and corners rounded.
- The Fulcrum: A 2-foot section of 4-inch diameter PVC pipe (heavy-walled) or a sturdy wooden rolling pin.
- Stop Blocks: Two small wooden strips (1×2 inches) to be screwed into the bottom ends of the deck.
The Build:
- The Stops: Screw the stop blocks to the underside of the plywood at each far end. This prevents the board from sliding completely off the PVC pipe, significantly reducing the risk of falls.
- Grip: Apply strips of colorful grip tape (skateboard tape) to the top surface to prevent the child’s feet from sliding.
- The Challenge: Start the child on a carpeted surface to increase friction and slow down the movement before moving to hardwood floors.
4. Project: The Rubber Band Paddle Boat
Target Skills: Elastic potential energy and fluid dynamics.
This classic DIY toy transforms bath time or a backyard puddle into a regalia of engineering.
Materials You’ll Need:
- Hull: Two large popsicle sticks or thin cedar shims.
- The Paddle: A small square of thin plastic (cut from a yogurt lid).
- The Motor: A thick, high-quality rubber band.
The Build:
- The Frame: Create a “U” shape by gluing two long sticks to a cross-piece at the front.
- The Paddle: Cut two slits in your plastic square and slide it onto the rubber band.
- Tension: Stretch the rubber band across the open end of the “U.”
- Operation: Wind the paddle backward to build up Elastic Potential Energy. When placed in water, the energy is released as kinetic energy, pushing the boat forward.
5. Engineering for Durability: The “Speed” Audit
Active toys undergo more stress than stationary ones. To keep your DIY vehicles and gear in top shape, perform a regular “Speed Audit”:
- Friction Inspection: Are the axles rubbing against the chassis? Use a drop of vegetable oil or a rub of candle wax on wooden axles to keep them spinning freely.
- Structural Integrity: For balance boards and stilts, check for wood fatigue or stress fractures in the PVC.
- Traction Check: Smooth plastic wheels often spin without “biting” the floor. Wrap a rubber band around the circumference of a bottle-cap wheel to give it instant “tires” with high-traction grip.
6. The Value of Failure in Active Play
When a DIY car doesn’t roll straight or a boat capsizes, it is an opportunity for iteration.
- Ask the child: “Why did the car veer to the left?”
- Let them discover that the axles aren’t parallel.
- Ask: “Why did the boat sink?”
- Let them discover the displacement of water.
In the world of DIY toys, the “broken” toy is often the most educational one, because it requires the child to think like an engineer to fix it.
Conclusion: Putting Play in Motion
By crafting active toys, you are bridging the gap between abstract physics and physical reality. A child who understands how to build a balloon-powered racer today is a teenager who understands automotive engineering tomorrow. You are giving them the tools to move through the world not just as passengers, but as drivers.