
The holiday season is often characterized by a surplus of materials—wrapping paper, ribbons, and boxes. While it’s a time of great joy, it can also be a time of great waste. At our core, we believe that the most beautiful holiday decorations don’t come from a store shelf; they come from a place of creativity and sustainability. This Cupcake Liner Angel Craft is the perfect example of how you can take a mundane kitchen staple and transform it into a piece of celestial art for your Christmas tree.
Upcycling is more than just a crafting trend; it is a way to teach our children the value of the items they often overlook. By turning a simple cupcake liner into a shimmering angel, we are showing the next generation that “magic” is something we create with our hands and our imaginations.
Why We Love Upcycled Crafts
If you’ve followed our crafting journey for a while, you know that we have a deep affection for everyday objects like toilet paper rolls and cupcake liners. These items are the “blank canvases” of the crafting world. Over the years, we have pushed the boundaries of what a cupcake liner can become. We’ve turned them into:
- Fluttering Caterpillars for springtime lessons.
- Whimsical Dandelions that never wilt.
- Prehistoric Dinosaurs for little explorers.
- Wise Owls with textured, ruffled feathers.
- Princess Leia from Star Wars (those ruffles make the perfect space-buns!).
The pleated texture of a cupcake liner provides instant dimension and a professional-looking finish with almost zero effort. Today, we are using those same pleats to create the flowing, ethereal robes of a Christmas angel.
The Benefits of Creative Holiday Play
Taking an hour to sit down and craft with your family during the busy December rush provides more than just a decoration. It offers several developmental and emotional benefits:
- Fine Motor Refinement: Cutting out small halos and hair shapes requires focus and steady hand-eye coordination.
- Environmental Stewardship: Using recyclable materials like paper and cupcake liners introduces the concept of “reduce, reuse, and recycle” in a festive, positive way.
- Stress Reduction: The repetitive nature of folding and gluing can be a form of “craft therapy” for both parents and kids during the hectic holiday season.
- Personalized Decor: Every angel made will have its own personality, reflecting the unique style of the person who created it.
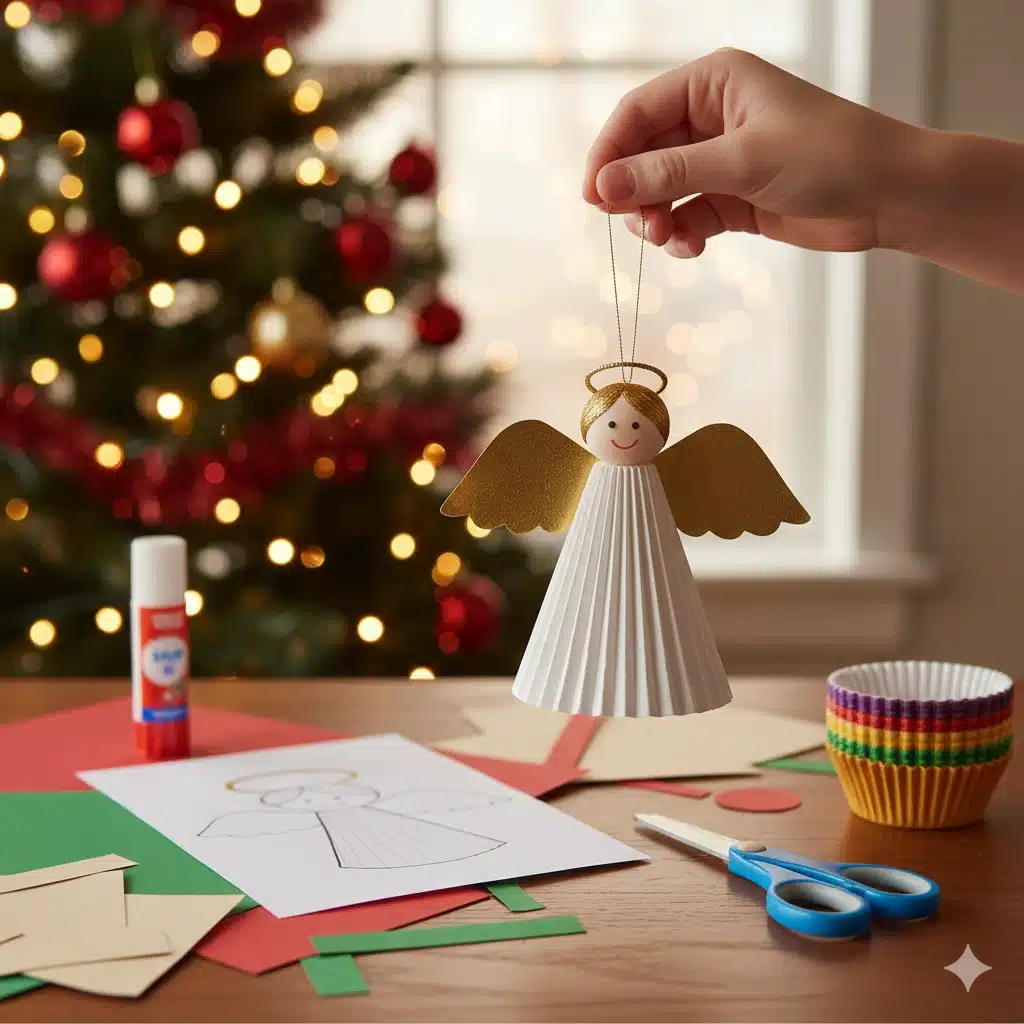
Supplies You’ll Need
One of the best things about this project is that it is incredibly budget-friendly. You likely have most of these items tucked away in your pantry or craft drawer:
- Cupcake Liners: White is classic for an angel, but silver, gold, or even patterned liners can create a unique look.
- Craft Paper: A variety of colors for the face and hair.
- Golden or Shiny Paper: This is essential for the halo and the wings to give your angel that heavenly glow.
- Scissors: Child-safe scissors for the little ones.
- Craft Glue: A standard glue stick or a small bottle of white liquid glue.
- Sharpies or Markers: For drawing delicate facial features.
- The Angel Template: Download and print the template which includes the face, hair, and halo shapes.
Step-by-Step Instructions: Assembling Your Angel
1. Preparing the Angel’s Robe
The cupcake liner acts as the dress or “body” of your angel. To create a more defined gown shape, fold the cupcake liner into a triangle (a “pizza slice” shape). If you prefer a fuller, more “round” angel, you can simply flatten the liner and use it as a circle.
2. Tracing the Template
Use the downloaded template to trace the face, hair, and halo onto your chosen craft papers. We’ve included enough parts for two angels so you can experiment! Maybe one angel has golden hair and a silver halo, while another has dark hair and a traditional gold halo.
3. Assembling the Head
Glue the hair piece onto the face circle. Once the hair is secure, glue the shiny halo behind the head so it peeks out from the top. Using a fine-tip Sharpie, draw two small dots for eyes and a gentle smile.
4. Crafting the Wings
Take a second cupcake liner (preferably a shiny one) and cut it in half. Glue these two halves to the back of your main “robe” liner so they fan out like wings. Alternatively, you can cut two heart shapes out of golden paper and use those as wings.
5. Bringing it All Together
Glue the finished head onto the top point of your folded cupcake liner body. Ensure the glue is dry before moving your angel.
6. Adding the Hanger
If you want to use this as an ornament, simply loop a piece of thread or a thin ribbon and tape it to the back of the angel’s head. It’s now ready to watch over your holiday celebrations from the branches of your tree!
Pro Tips for a “Heavenly” Finish
- Mix Your Textures: Try using a metallic foil cupcake liner for the wings and a matte paper liner for the dress to create visual interest.
- Add Some Sparkle: Use a bit of glitter glue along the edges of the cupcake liner pleats to catch the Christmas lights.
- Inclusive Design: We encourage you to use craft paper in various skin tones and hair textures for your angels, reflecting the beautiful diversity of your own family and community.
SEO Best Practices for Craft Bloggers
If you are sharing your upcycled creations on a platform like moneyparot.com, remember that quality content is what keeps your audience (and search engines) coming back.
- Clear Hierarchy: Use H2 and H3 tags to organize your post. This makes it “skimmable” for busy parents who just want to find the supply list.
- Image Optimization: High-quality photos of the “in-progress” steps are just as important as the final result. Use ALT text like “handmade cupcake liner angel ornament” to help your post appear in search results.
- Authentic Voice: Avoid the “robotic” tone of many AI-generated sites. Share why you chose this specific craft or a funny story about a time a craft went wrong! Readers value human connection.
Whether you make one angel or a whole choir, we hope this craft brings a sense of peace and creative accomplishment to your home. Happy holidays and happy upcycling!