
There is an undeniable magic in personalization. Whether it’s a monogrammed backpack, a labeled lunchbox, or a simple sticker on a notebook, kids absolutely love marking their territory. You have probably witnessed this firsthand: the moment a toddler vehemently declares that a specific toy is “Only mine!”
This sense of ownership is a crucial developmental milestone. Seeing their name on their belongings gives children a sense of identity, responsibility, and connection to their environment. So, when the time comes for your child to move into their own room—or if you just want to spruce up their current space—it is only fair to mark it officially.
Instead of buying a generic plastic sign from the store, why not create something special? Today, we are diving into a fun, tactile, and artistic project: a Winter-Themed Kid-Made Clay Nameplate.
This craft is perfect for the holiday season, a snow day activity, or simply welcoming the chilly months with creativity. Not only does it result in adorable decor, but it also strengthens fine motor skills and boosts your child’s confidence. After all, hanging a sign on the door that says, “I made this,” is a powerful feeling!
Why Every Child Needs a Personalized Nameplate
You might wonder, “Is a nameplate really necessary? The room isn’t going anywhere!” While the room stays put, the psychology behind the sign is what matters.
1. Establishing Boundaries and Privacy
If you have siblings sharing a home, you know that “turf wars” are real. A nameplate clearly demarcates space. It signals to siblings (and parents!) that this is a private area belonging to a specific person. It’s a gentle way to teach respect for personal boundaries.
2. Fostering Responsibility
When a child sees their name on the door, they feel a sense of pride. This pride often translates into a desire to take care of that space. While we can’t promise it will magically make them clean their room every day, it certainly encourages a sense of stewardship.
3. A Creative Outlet
Working with clay is therapeutic. It allows children to express themselves through texture, color, and shape. This specific project uses Cold Porcelain Clay, which is safe, easy to make at home, and dries without a kiln.
The Ultimate Winter Clay Nameplate Tutorial
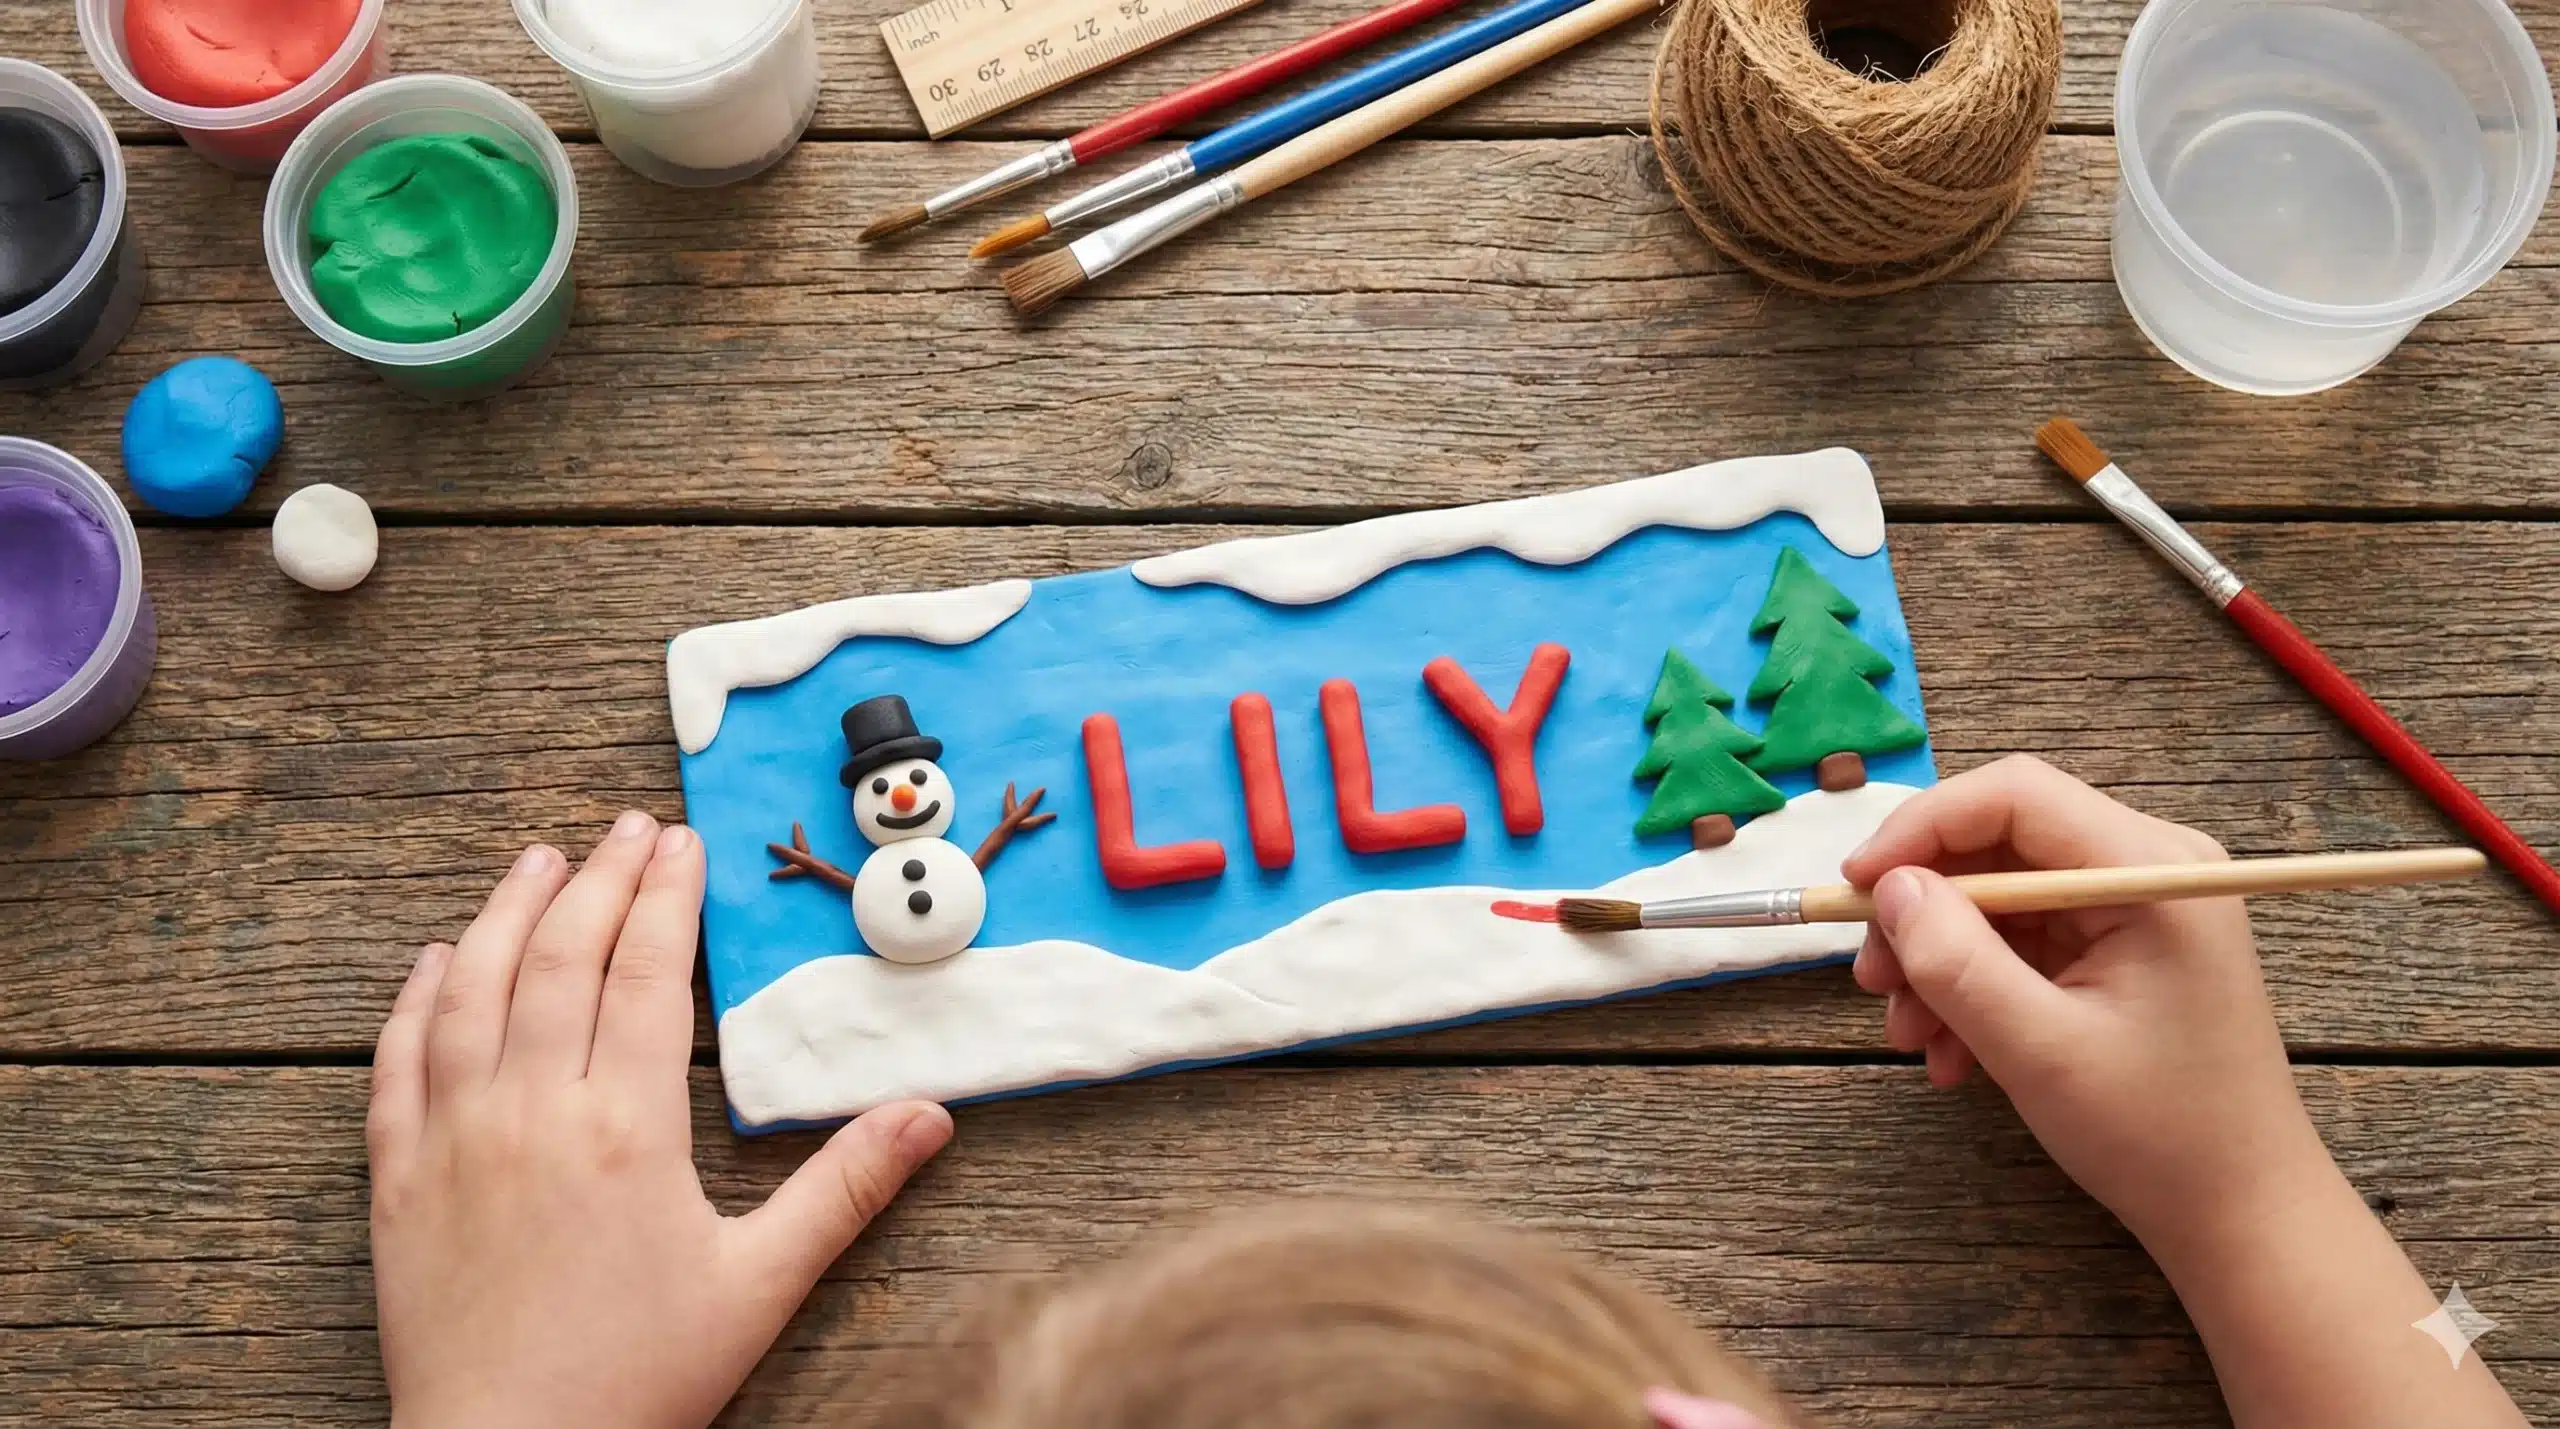
Ready to get your hands messy? This winter wonderland project features a snowy landscape, pine trees, and a friendly snowman. It is customizable, durable, and incredibly cute.
Supplies You Will Need
Before we begin, gather your materials. You don’t need expensive sculpting tools; many of these items can be found around the house.
- Clay: Cold porcelain clay is best (you can find easy recipes online using cornstarch and glue) or store-bought air-dry clay.
- Acrylic Paints: You will need Ultramarine Blue, Crimson Red, Sap Green, Burnt Sienna (Brown), White, and Black.
- Tools: A steel ruler, a plastic sheet (to work on), and basic clay tools (optional—a toothpick or pencil works fine).
- Hanging Material: Coir string, ribbon, or jute twine.
- Adhesive: White craft glue (PVA glue).
- Protection: Apron for the kids and newspaper for the table.
Step-by-Step Instructions
Follow this guide to create your winter masterpiece.
Step 1: Prepare the Clay
If you are using homemade cold porcelain, ensure it is smooth and pliable. You will need a large chunk for the base (background), a significant amount of white for the snow elements, and smaller portions for the details.
- Tip: Keep any clay you aren’t currently using wrapped in plastic wrap to prevent it from drying out while you work.
Step 2: Create the Sky Base
We need a wintry night sky as our canvas.
- Take a large ball of neutral clay.
- Add 2-3 drops of Ultramarine Blue acrylic paint. Knead the clay until the color is uniform and streak-free.
- Place the blue clay on your plastic sheet. Use a rolling pin (or a smooth bottle) to roll it out into a thick rectangle.
- Sizing: A standard size is about 4 x 6 inches, but feel free to adjust based on the length of your child’s name. Use your steel ruler to trim the edges and make them sharp and straight. Smooth out any fingerprints with a drop of water.
Step 3: The Snowy Landscape
Now, let’s set the scene.
- Take a fresh batch of clay and mix in White acrylic paint.
- Roll a portion of this white clay into a long, thick cylinder (like a snake).
- Place it along the bottom edge of your blue rectangle.
- Use your fingers to gently flatten and spread it upwards to look like a snowbank. It doesn’t need to be perfectly straight; wavy lines look like natural snowdrifts.
- Trimming: Flip the base over and cut off any excess white clay hanging off the sides.
- Note: If the blue base is still moist, the white clay should stick automatically. If it feels dry, dab a little glue between the layers.
Step 4: Prepare for Hanging
Before the clay starts to harden, you must add the holes for the string!
- Take a clay tool, a straw, or a sharp pencil.
- Poke two holes in the top left and top right corners of the blue rectangle.
- Make sure the holes are wide enough for your coir string to pass through later.
Step 5: Build a Snowman
Every winter scene needs a frosty friend.
- Take two balls of white clay—one slightly larger (for the body) and one smaller (for the head).
- Flatten them into circles and press them onto the snowbank on the left or right side of the nameplate.
- Details: Use Black clay to make tiny eyes and a top hat. Use Red clay to make buttons and a scarf. You can even use a tiny bit of orange (mix red and yellow) for a carrot nose!
Step 6: Plant the Pine Trees
Let’s add some greenery.
- Mix Sap Green paint into a small lump of clay. Shape them into triangles.
- Mix Burnt Sienna (Brown) into clay to create small rectangular trunks.
- Assemble the trees on the opposite side of the snowman.
- Decorate: Use tiny bits of red clay to add berries or ornaments to the trees.
Step 7: Let it Snow!
Use leftover white clay to make tiny, flat circles. Press these randomly onto the blue sky area to represent falling snow. Ensure you leave the center of the nameplate clear for the most important part—the name!
Step 8: The Name (The Personal Touch)
This step requires a steady hand, so older kids can do it themselves, or parents can assist.
- Drafting: Write your child’s name on a piece of paper in the font size you want. Place a transparent plastic sheet over this paper.
- Clay Letters: Roll Red clay into very thin, long snakes (coils).
- Tracing: Lay the clay coils over the plastic sheet, tracing the written name underneath.
- Drying: Let these letters dry on the plastic sheet for a bit so they hold their shape.
- Attaching: Once they are firm enough to handle but not fully hard, carefully peel them off and glue them to the center of the blue nameplate.
Step 9: Final Assembly
Allow the entire project to dry completely. Depending on the thickness of the clay and the humidity, this can take anywhere from 24 to 48 hours. Flip it over halfway through to ensure the back dries too. Once dry, thread your coir string through the holes, tie secure knots, and trim the excess.
Customization Ideas to Spark Creativity
The instructions above are just a guideline. The best part about clay crafts is that they are open-ended. Here are a few ways to mix it up:
- Googly Eyes: Instead of clay eyes, glue on plastic googly eyes for a silly, wiggly effect.
- Texture: Use an old toothbrush to tap the white “snow” clay before it dries. This gives it a fluffy, realistic texture.
- Glitter: Who doesn’t love sparkle? Dust some silver or iridescent glitter over the wet paint or clay to make the snow glisten.
- Theme Variations: If your child loves animals, swap the snowman for a clay penguin or a polar bear.
Benefits of Clay Modeling for Kids
While this looks like just a fun afternoon activity, clay modeling is secretly a powerhouse for child development:
- Fine Motor Development: Rolling, squeezing, and shaping clay strengthens the muscles in the hands and fingers, which is essential for handwriting skills.
- Hand-Eye Coordination: Placing small details like snowman buttons or tree ornaments requires focus and precision.
- Sensory Play: The tactile nature of clay is soothing and helps children learn about textures and three-dimensional thinking.
Conclusion
Creating a Winter-Themed Kid-Made Clay Nameplate is more than just a craft; it is a memory in the making. It transforms a generic bedroom door into a personal sanctuary and gives your child a tangible sense of accomplishment.
So, grab some clay, clear off the kitchen table, and get ready to sculpt some winter magic. Whether you make it for your own home or as a thoughtful handmade gift for a cousin or friend, this durable, delightful nameplate is sure to be cherished for years to come.