
Before we dive into the paint, let’s look at why handprint art is a staple in early childhood education:
- Sensory Exploration: Feeling the cold, wet paint on their palms is a vital sensory experience for young children.
- Fine Motor Development: Controlling where the hand lands on the paper helps with hand-eye coordination.
- Emotional Connection: Children feel a sense of ownership when their own body part is used to create a character like the Grinch or a Lorax.
Top 10 Dr. Seuss Books to Pair with These Crafts
To make the most of your crafting session, we recommend reading the corresponding book first. Here are the top 10 Seuss classics:
- Green Eggs and Ham
- How the Grinch Stole Christmas
- The Lorax
- The Cat in the Hat
- One Fish Two Fish Red Fish Blue Fish
- Fox in Socks
- Horton Hears a Who!
- Oh, The Places You’ll Go!
- There’s a Wocket in My Pocket!
- Ten Apples Up on Top!
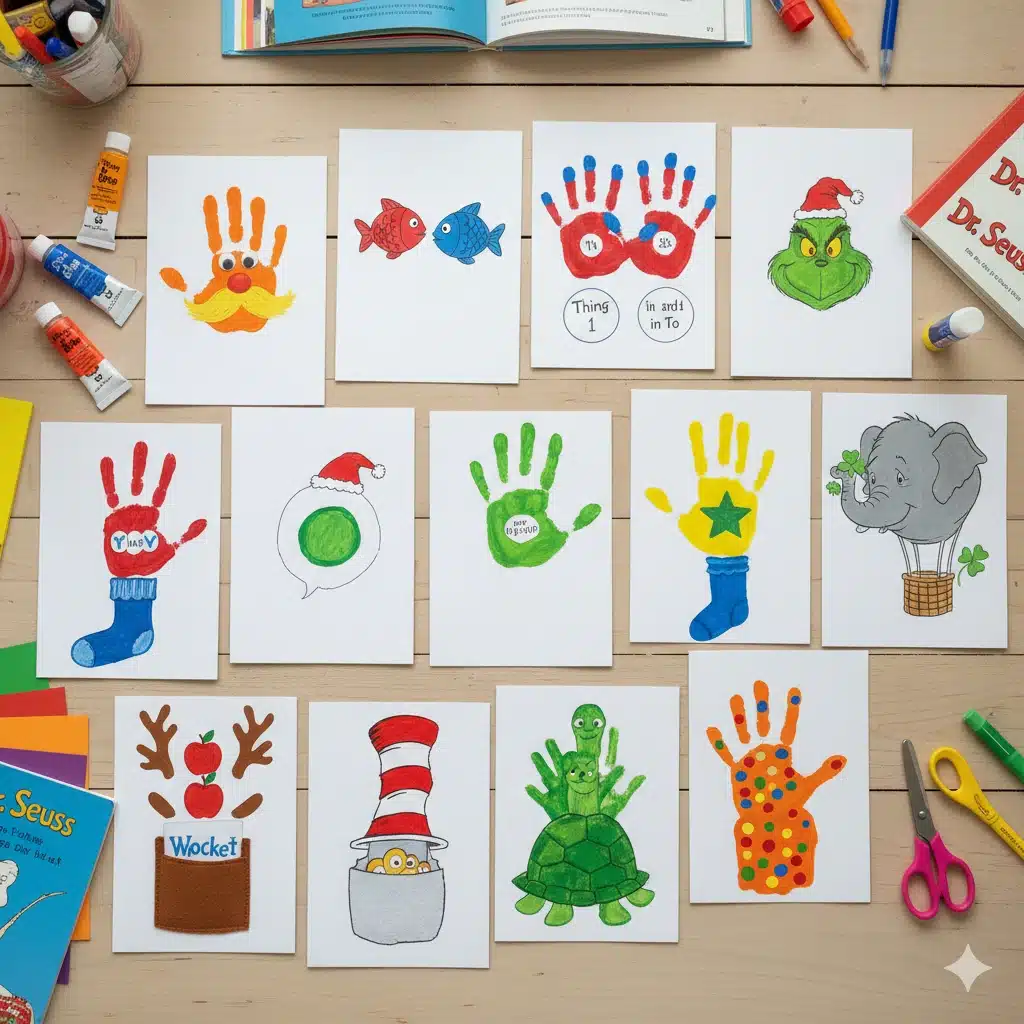
15 Creative Seuss Handprint Crafts
1. The Lorax “I Speak for the Trees” Handprint
The Lorax is a fan favorite for teaching environmentalism.
- How to: Paint the child’s hand bright orange. Press it onto the paper with fingers pointing down—these become the Lorax’s legs and body. Once dry, add a large yellow construction paper mustache and googly eyes.
2. One Fish, Two Fish (Multi-Colored)
This is the easiest way to teach colors to toddlers.
- How to: Paint one hand red and the other blue. Press them horizontally on the paper. The thumb becomes the top fin, and the fingers become the tail. Draw a simple smile and a bubble coming from the mouth.
3. Thing 1 and Thing 2 Handprint Hair
The chaotic twins from The Cat in the Hat are famous for their wild blue hair.
- How to: Paint the child’s palm red (for the body) and their fingers bright blue (for the hair). Press down. Add a white circle in the middle of the red palm and write “Thing 1” or “Thing 2.”
4. The Grinch Handprint (Green and Mean)
Perfect for those who love the holiday classic year-round.
- How to: Use lime green paint. Press the hand with fingers pointing down. The fingers represent the Grinch’s shaggy fur. Add a small red “Santa hat” on the heel of the handprint.
5. Green Eggs and Ham “Plate”
- How to: Paint the palm white and the center of the palm green. When pressed, it looks like a fried egg with a green yolk! This is a great way to talk about trying new foods.
6. Fox in Socks (Red Handprint)
- How to: Use red paint. The fingers pointing up represent the fox’s ears and fur. Add a blue “sock” shape made of paper to the bottom of the handprint to represent the character’s famous footwear.
7. Horton the Elephant’s Ear
- How to: Use grey paint. A single handprint placed sideways next to a grey circle (the head) makes the perfect large elephant ear. Don’t forget to draw a tiny “clover” with a “Who” on it!
8. Cat in the Hat’s Striped Hat
- How to: This one uses the fingers as the stripes. Paint the fingers alternating red and white. Press them onto the paper to create a tall, “finger-striped” hat.
9. The Sneetches (Yellow Handprint)
- How to: Use yellow paint for the body. The most important part? A small green star sticker or drawing on the “belly” (the palm).
10. Oh, The Places You’ll Go! Hot Air Balloon
- How to: Paint each finger a different bright color (pink, yellow, blue, green). Press down to form the balloon. Draw a small brown basket underneath it.
11. Thidwick the Big-Hearted Moose (Antlers)
- How to: Paint both hands brown. Place them at the top of a brown paper plate. The handprints become Thidwick’s massive, welcoming antlers.
12. There’s a Wocket in My Pocket!
- How to: Cut a “pocket” shape out of felt or paper. Use a bright neon paint for a handprint “Wocket” that peeks out from the top of the pocket.
13. Ten Apples Up on Top!
- How to: Paint the arm and hand brown (the tree/arm). Then, use red fingerprints to “stack” ten apples on top of the fingers. Great for counting practice!
14. Yertle the Turtle Shell
- How to: Use green paint. The palm becomes the shell. Draw a small head and tail coming out from the sides. You can even stack several handprints to show the “turtle tower.”
15. Put Me in the Zoo (Polka Dot Leopard)
- How to: Paint the hand orange. Once dry, let the child use their fingertips to add multi-colored “polka dots” all over the handprint, just like the character in the book.
Tips for a Mess-Free (or Less-Mess) Crafting Session
We know that paint and toddlers can be a daunting combination. Here is how to keep the “Seussian Chaos” to a minimum:
- Wet Wipes are Mandatory: Keep a pack right next to the crafting station to wipe hands immediately after the print is made.
- Use Washable Tempera Paint: Avoid acrylics for young children; tempera is easier to get out of clothes and off skin.
- Thick Cardstock: Regular printer paper will curl when it gets wet with paint. Use heavy cardstock so the handprints stay flat for display.
Educational Extensions: From Crafting to Learning
You can turn these handprints into a full lesson plan:
- Rhyme Time: While making the One Fish Two Fish craft, ask the child to find words that rhyme with “fish” or “red.”
- Counting: Use the Ten Apples Up on Top craft to practice counting from 1 to 10.
- Color Theory: Show them how mixing red and white (for the Cat’s hat) can make pink.
Final Thoughts
Dr. Seuss once said, “You’re never too old, too wacky, too wild, to pick up a book and read to a child.” By adding these Handprint Crafts to your reading routine, you are making the stories three-dimensional. These pieces of art will become cherished memorie