
If you have been following our creative journey, you know that we advocate for “low-mess, high-impact” projects. Using materials like cupcake liners and toilet paper rolls offers several advantages:
- Sustainability: By using items you already have in your pantry, you reduce waste and teach children the importance of being environmentally conscious.
- Texture and Dimension: The natural pleats of a cupcake liner provide a built-in 3D effect. When you fold or layer them, they create a “shabby-chic” texture that flat paper simply cannot replicate.
- Affordability: You don’t need a trip to a specialized hobby store. Most of the supplies for this angel are likely sitting in your kitchen drawer or school supply box.
- Inclusivity: One of the highlights of this specific craft is the ability to customize. Angels come in all forms, and by using different shades of craft paper, you can create a beautiful, diverse “choir” of angels that reflects the world around us.
Supplies You’ll Need
To get started on your heavenly herd, gather these simple materials:
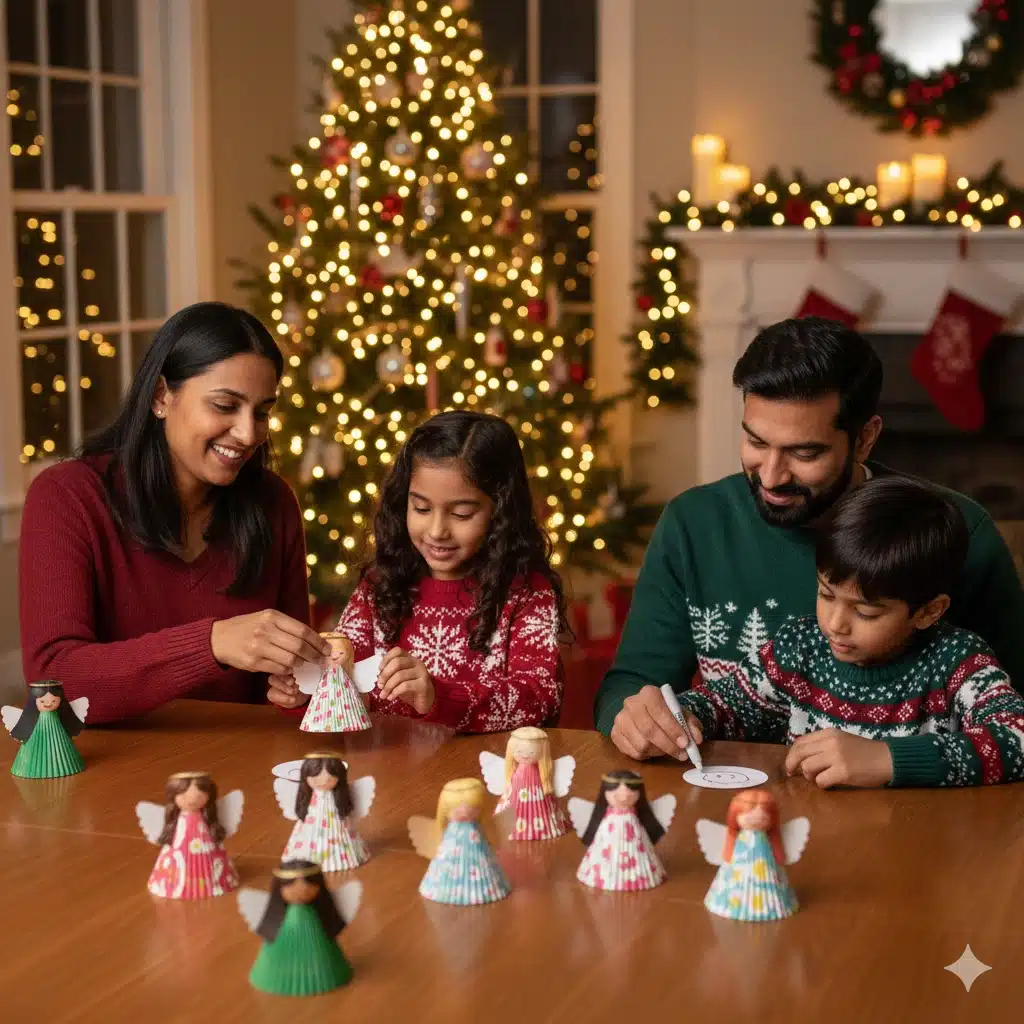
- Cupcake Liners: White is classic, but silver, gold, or even patterned liners (like polka dots or florals) make for very fashionable angels.
- Craft Paper: A variety of shades for faces and hair.
- Golden or Shiny Paper: For that essential, shimmering halo. (Yellow cardstock is a great substitute).
- Craft Glue: A standard glue stick or a small bottle of white school glue.
- Scissors: Safety scissors for the little ones.
- Sharpies or Markers: To draw delicate facial features.
- Twine or Ribbon: If you plan on hanging your angel as an ornament.
Step-by-Step Instructions: Bringing Your Angel to Life
This craft is designed with simplicity in mind, making it suitable for toddlers with supervision and a fun DIY for older kids.
Step 1: Prepare Your Pieces
Using our downloadable template, trace the parts of the angel onto your chosen craft paper.
- The Face: Cut a small circle. We encourage experimenting with skin tones—try light tan, deep brown, or soft peach.
- The Hair: Cut out the hair shape. You can do long flowing locks, short curls, or even braids!
- The Halo: Cut a small ring or solid circle out of your golden paper.
Step 2: Create the Angel’s Gown
Take one cupcake liner and fold it in half to create a semi-circle. To give the gown more “poof” and stability, you can glue two liners together or fold the sides slightly inward to create a more triangular, “A-line” dress shape. The pleats of the liner naturally mimic the folds of a fabric robe.
Step 3: Assemble the Head
Glue the hair piece onto the face circle. Once the glue is set, use a fine-tip Sharpie to draw two closed, “peaceful” eyes and a small smile. Finally, glue the golden halo to the back of the head so it peeks out from the top like a crown of light.
Step 4: The Wings (The “Double Liner” Trick)
An angel isn’t complete without wings! You have two options here:
- Paper Wings: Use the template to cut out traditional wing shapes.
- Liner Wings: Take a second cupcake liner, fold it into a “bow-tie” shape, and glue it to the back of the gown. The ruffled edges make the wings look soft and feathery.
Step 5: Final Assembly
Glue the finished head onto the top of the cupcake liner gown. If you want to turn this into a 3D ornament that stands on a table, you can glue the gown onto a small cardboard cone or an empty toilet paper roll.
If you’d rather hang it on the tree, simply tape a loop of twine to the back of the halo.
Fun Ways to Use Your Cupcake Liner Angels
Beyond tree ornaments, these little angels are incredibly versatile:
- Gift Toppers: Tape an angel onto a wrapped present instead of a plastic bow. It adds a personal, handmade touch that the recipient will treasure.
- Place Cards: If you are hosting a holiday dinner, write your guests’ names on the bottom of the angel’s gown and place them on the dinner plates.
- Holiday Bunting: String a dozen angels together with a long piece of yarn to create a festive garland for a mantel or a child’s bedroom window.
- An “Angel of Kindness”: Use the craft as a teaching tool. Every time a child does something kind during December, they get to add one “feather” (a small snip or a sticker) to their angel’s wings.
Expanding Your Cupcake Liner Universe
Once you see how easy it is to work with cupcake liners, you won’t want to stop! As we’ve mentioned before, this humble material is a “chameleon” in the crafting world. You can use these same folding techniques to create:
- Colorful Dandelions: By fringing the edges of multiple yellow liners.
- Sturdy Dinosaurs: Using the liner as a textured “back” for a Stegosaurus.
- Royal Princesses: Just change the hair and add a crown!
Conclusion: Spreading Light and Creativity
This Cupcake Liner Angel Craft is a reminder that the holiday season doesn’t have to be expensive or complicated to be meaningful. By taking a few minutes to sit down at the kitchen table with some paper and glue, you are doing more than just making a decoration. You are fostering a child’s imagination, practicing fine motor skills, and creating a symbol of peace and joy.